If you have uneven wear on your rear tires which is causing vibration when you exceed 50 miles-per-hour you likely need your struts repaired. Struts slow down the rebound of your spring/strut system, keeping the tires in contact with the pavement. When your struts get bad your tires will actually leave the ground when you hit bumps, causing the wheels to “skid” when they come back into contact with the pavement. It is this skidding that causes the uneven wearing on your tires. Don’t ruin a perfectly good set of tires–replace your struts, and you can do it yourself…
How to Replace Front Struts on Toyota Sienna 2004-2010
Hardware:
- 2004 Toyota Sienna XLE FWD
- Left Monroe 72237 Sensa-Trac Strut (buy the left one here
)
- Right Monroe 72236 Sensa-Trac Strut (buy the right one here
- 2 Suspension links (both sides are identical): ACDelco 45G0402 Professional Front Stabilizer Shaft Link (buy on amazon.com here
)
3 Important Pre-Repair Tips to ConsiderI started this posting with the idea that I’d take lots of pictures. There were two issues I ran into that got me off track (therefore not that many pics) that I can help you avoid–not planning ahead for replacing the suspension links, spraying the bolts with WD-40 in advance, and having a powerful enough impact wrench. It’s been over a year since I did this repair and I figured I might as well post what I have because I believe my experience will be helpful to others. My posting details wane towards the middle of this repair but the prep I share I think will be very valuable to someone who hasn’t done this before.
Tip 1: Spray WD-40 on the bolt threads and nut of the suspension link(s) and lower strut bolts.
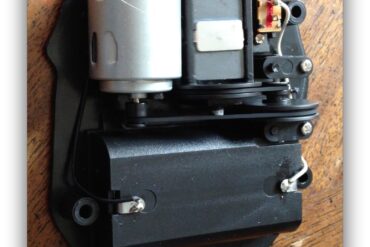
Do this multiple times over a few days before tackling this project so it can soak in and loosen up the bolt and EASE the removal of the suspension link. The bolts of the suspension links are rather long, the end of the upper bolt is allen keyed, and therefore will be prone to stripping out (it’s hard to have a wrench on one end and be torquing on it and keep the allan wrench straight and all the way in the other end). It could take a long time for you to unbolt them (if you are able to at all, without stripping something out) if you have not soaked them down with WD-40. The first one I did stripped out and I had to cut it off with my Sawzall!?!?! This is the bolt:
 |
| The bolt I had to cut off from the suspension link |
You can easily spray them without taking the wheel off. For the left one just turn your wheel all the way to the left and you will be able to get at it from around the front of the tire.
 |
| Spray WD-40 on these 4 bolts to ease your repair! You don’t need to take off your wheel to do this, btw. |
Tip 2: Decide ahead of time to replace the suspension links when you change the struts.
They aren’t that expensive and you may tear up them when you take them off and you don’t wan’t to be left waiting on parts or having to buy (and overpay for) them locally (if you’re like me). You can get them on amazon.com here (don’t forget to buy 2 of them if you are replacing both struts). It’s easier to put the car back together when the suspension links are new as well.
Tip 3. Borrow a strut spring compressor kit from your local hardware shop in advance so you have it when you need it.
They made me buy them but then when I returned them they gave me a refund.
As an overview, here’s the diagram of the area we’ll be working on from the shop manual:
 |
| 2004 Toyota Sienna front strut assembly diagram |
How to Replace the Front Struts on a FWD 2004 Toyota Sienna
Step 1: Remove the front wheel.
The right or left wheel, whichever you want to do first. Make sure you place blocks in front and behind both your back wheels and use jack stands to support your vehicle to be safe.
 |
| Block your back wheels to be safe |
Something that I found handy was this diagram showing the lift points on my van (Front wheel drive model only):
 |
| Lift points on a FWD (front wheel drive) 2004 Toyota Sienna |
Step 2: Remove both wiper arms.
First take note of the location of the wipers on the windshield before you remove the wipers so you know where to put them when you reinstall. On our van the left one doesn’t seem to go as low as you would think it should, but it hits if you install it any lower. To get to the top strut bolts you must take off the plastic cover over the wiper motor assembly and cabin ventilation intake. First you must pop off the wiper arm head caps that cover the wiper arm bolts. You might be able to pop them off with your fingernails or a pocketknife. They are plastic so be careful not to gouge them. If you choose to use a flat-head screwdriver make sure you cover the end with electrical tape. After you remove the bolt it helps to bend the wiper arm back, putting pressure at the hinge point, to remove the arm from the shaft.

Step 3: Remove the plastic cowl top from the windshield wiper housing.
The cowl snaps into the metal body of the van along the lower edge. Here you can see the clips. I simply squeezed them with my finger tips while lifting up the cowl.
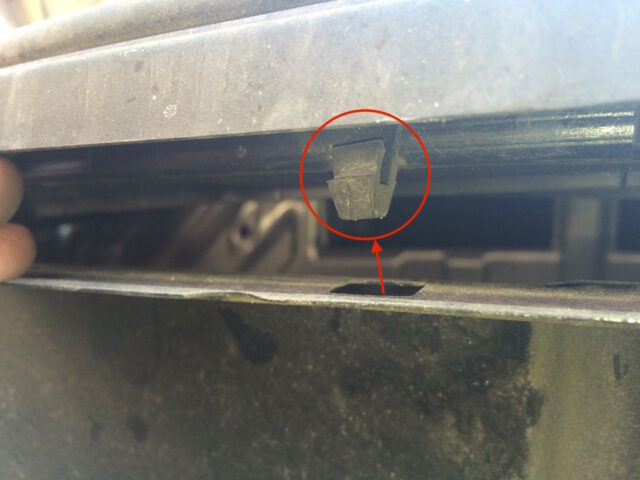 |
| Cowl snaps up close |
On the top edge it tucks under with plastic tabs:
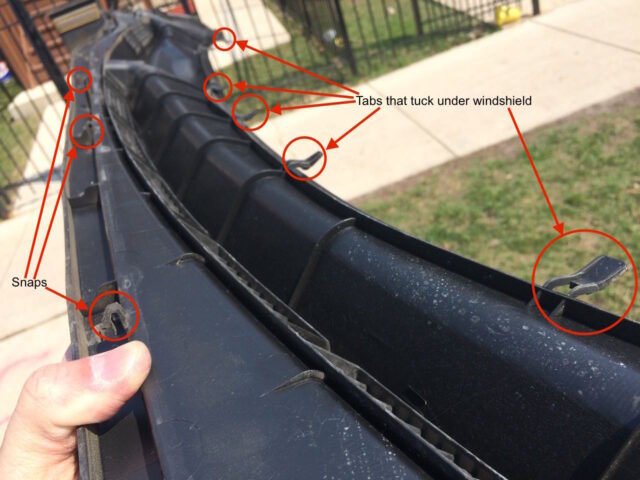 |
| The bottom side of the cowl shows the tabs one one edge and the snaps on the other |
Step 4: Disconnect the suspension link.
Use an allen wrench and a closed box wrench to remove the top bolt. It was very difficult to keep the allen wrench in the end of the bolt and hold it straight while trying to torque like crazy to get the nut off. This is where things broke down on my first go-around and why I put the warnings/tips at the beginning to make sure to lube up the nut and bolt so you don’t run into the problems I ran into. One thing that is nice is that the bottom bolt has a place where you can put an open-ended wrench on it and hold it in place while you loosen the nut.

Step 5: Disconnect the brake hose from the strut and secure it out of the way.
There is one bolt, circled in red below:

Step 6: Remove the two lower bolts on the strut.
This is another place I ran into problems. The air impact wrench I purchased off amazon.com was a piece of junk and wouldn’t budge them. They are finely threaded and were on there good. I wish I would have sprayed them down with WD-40 like I suggest at the beginning of this post!
 |
| Lower bolts of the strut, which the manual calls the “front shock absorber” |
Step 7: Separate the strut from the wheel.
Make sure you support the wheel hub so you don’t damage the brake line, which is connected to the wheel hub assembly (and the drive shaft). You may need to rotate the driveshaft a bit to get the hub to lower down out of its place in the bottom of the strut.
Step 8: Unscrew the top 3 mount nuts and remove the strut from the vehicle.
NOTE: Support the strut from below when you remove the last of the 3 nuts so you can catch the strut (and not risk damaging your brake line, etc). Be careful not to hit the windshield with the handle of your wrench either when you are breaking free the nuts.
Step 9: Use a spring compressor to compress the strut.
You don’t need to buy this tool because they will loan them to you at your local parts store for only a refundable downpayment. This is a potentially dangerous step, compressing the spring, so be careful.
Step 10: Unscrew the top strut mounting bolt.
Take note of how far the nut is on the bolt before removing. As you separate the parts from the top of the strut pay attention to their order so you can reassemble in the correct order. Refer to the diagram at the top of this tutorial as well.
Step 11: Remove the old strut and install the new one.
You’ll need to re-use the rubber front spring bumper off the shock–take note of which way it came off the old shock (or refer to the diagram at the top of this page). Tighten the top bolt. Release the spring, making sure to release the pressure from all three bolts evenly.
Step 12: Insert the new strut into the van and tighten the top 3 bolts.
Step 13: Insert the wheel hub assembly back into place at the bottom of the strut and line up the bolt holes.
Step 14: Install the 2 lower bolts.
Step 15: Re-secure the brake line.
Step 16: Install the suspension link.
I did not get the bolts tight enough when I reinstalled the suspension link on one side of my van and heard some clunking noises when I hit bumps. It took me a while to figure out what I did wrong. Make sure you cinch up those bolts tight.
Step 17: Reinstall the wheel.
Tighten your lug nuts in a star pattern
All My Toyota Sienna Posts:
- How to Change the Air Conditioner Display on a 2004 Toyota Sienna From Metric to English
- How to Replace the Front Struts on a FWD 2004 Toyota Sienna
- How to Change the Air Filter on a 2004 Toyota Sienna
- 2004 Toyota Sienna XLE DVD Entertainment System Does Not Display Video After Turning Vehicle Back On
- How to Fix Sienna Dome Lights Randomly Coming On And Alarm Going Off
- How to Replace the Rear Liftgate Shocks on a 2004 Toyota Sienna
- How to Change the Cabin Air Filter on a 2004 Toyota Sienna
- How to Program the Door Lock Transmitter on a 2003 Toyota Sienna
- How to Replace the Power Sliding Door Cables on a 2004-2007 Toyota Sienna XLE
- How to Prolong the Life of Your Toyota Sienna Sliding Door Cables
- How to Replace the Stereo on a 2004-2010 Toyota Sienna
- How to Fix The Spring on the Cassette Door on a 2004-2010 Toyota Sienna Stereo
- How to Program a Keyless Entry Remote for a 2004-2010 Toyota Sienna
- How to set the Time/Clock on a 2004-2010 Toyota Sienna
- Horn Won’t Work-How to Troubleshoot The Horn on a 2004-2007 Toyota Sienna
- How to Remove the Front Bumper on a 2004-2007 Toyota Sienna
- How to Replace the Starter on a 2004-2007 Toyota Sienna
- How to Replace the Thermostat on a 2004-2007 Toyota Sienna
- How to Replace the Radiator on a 2004-2007 Toyota Sienna
Amazon Associate Disclosure: As an Amazon Associate I earn from qualifying purchases. This means if you click on an affiliate link and purchase the item, I will receive an affiliate commission. The price of the item is the same whether it is an affiliate link or not. Regardless, I only recommend products or services I believe will add value to Share Your Repair readers. By using the affiliate links, you are helping support Share Your Repair, and I genuinely appreciate your support.
Lots of people reporting grief removing the two main strut bolts and suspension bolt. I had the same grief, I had to heat them, I used a portable propane torch that one would use for soldering copper pipe and available at hardware stores. Heat the nut up, the differential expansion often breaks it free. I do restoring on old cars, this is often a trick we have to resort to to get rusted bolts off. I live in Canada or the snow belt, lots of snow and of course salt which leads to a lot of rust and corrosion. Impact wrench and even a two foot breaker bar didn’t work, apply heat and they come off. Thanks for the detailed instructions, they do help whether it is power sliding doors or struts.
Great, that’s going to save me a lot of time. Thanks for your quick reply!
No problem. And, although I mentioned only 5 bolts, there are others, including the brake line bolt and the screws etc you’ll need to remove to access the top 3 bolts, but those are necessary even if you keep your old springs.
Hi, I’m planning to do this on a 2002 model, which looks pretty similar. I’d buy the full strut/coil spring/shock assembly, so my question is : would I still need to compress the strut?
BTW, very well explained!
Thanks a lot already for this guide
Thanks for the question Josh. If you buy the complete strut, with spring, you will not need a spring compressor because you’ll be throwing your old spring away. There will just be the 3 bolts on top and the two below and the spring will come off with the strut in one piece.
Hey John,
Awesome write-up! I’m looking at doing the struts in my parents’ van soon and this is really helpful.
As a side note, you can buy allen-head sockets* that make jobs like that sway bar link so much easier. I’ve not worked on the Sienna as much but spent a lot of time fixing old German cars, and I’ve found that the best method for getting off an allen-headed bolt it this:
1) Use a pick tool to scrape out any rust/crud build-up.
2) Use a wire brush (or a Dremel attachment, if you have one) to clean it out.
3) Put one of those sockets in. Usually a gentle tap with a hammer to make sure it’s all the way in is a good idea — one of the main reasons allen-headed bolts strip is that the socket is not all the way in.
4) Now just remove it like you would any other bolt or nut.
*link to a set similar to what I have: http://www.sears.com/craftsman-82-piece-socket-wrench-set/p-00917151000P?sellerId=SEARS&prdNo=2&blockNo=2&blockType=G2
Thanks for sharing those insights! I now have a metric die set, which I would use to clean the threads in lieu of brushing them, like you suggest. I’ve actually purchased a set of suspension links which I plan on installing because since I’ve replaced those front shocks, I’ve gone through a couple sets of links because they go bad on me and rattle around when you hit bumps. If I do the repair myself I’m going to add some details to this article and I’ll take into consideration what you’ve shared. Thanks!
I did this same job earlier this fall. The car has pulled to the right ever since. I had the car aligned twice and the service center says everything is in spec. I am suspecting that I did not orient the top bushing on one side or the other correctly. Not that the bushing is wedge shaped and that wedge can point in any of three directions. You didn’t mention this in your summary. I know I should have carefully checked the alignment of the bushing when it came out, but I guess I wasn’t careful enough. In my case the replacement bushing had an arrow, the old ones did not. Do you have any insight as to what orientation I should have installed the top bushing?
I was aware that some vehicles have adjustable wedges but I am not under the understanding that this vehicle has that feature on it. I followed the official Toyota shop manual when I did this repair and I cannot remember it saying anything about that. I feel like there is only one way to put the strut in there–until the strut is turned so the lower bolts will line up, there’s no other way to put it back together. I am going to check the repair manual and check back in if I see anything else that may help. Thanks for leaving a comment Justin.
Are these the arrows you are referring to? In this diagram they point towards the outside of the van: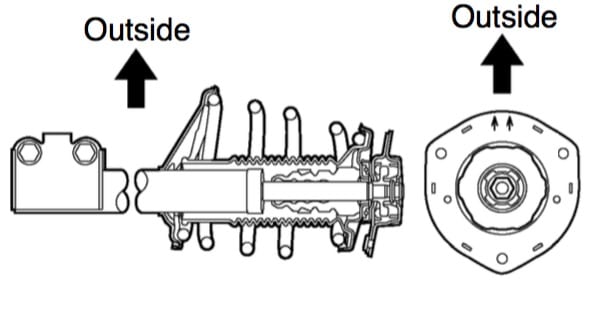
Hello John;
Your front strut repair description for the Sienna was right on the mark. The two main bolts I had no problems to break, however, the suspension link bolt nut would not budge. It is very difficult to hold on to the allen key while applying torque on the spanner inside the wheel well. I hope someone designs a tool head for that !!.
I will spray it for the next 2 days and give it a shot or else saw it off as you did.
– Thanks
Arvind
Thanks for sharing Arvind. If I were you I’d order the replacement suspension links right away like I suggest in my article. They aren’t that expensive and they will be a major pain when you go to reinstall them (holding the Allen key straight while tightening) AND, if you do not get them very tight they will loosen up on you and you will hear a clunking sound when you hit bumps and you’ll be replacing them later anyway.
Nice summary. Bolt sizes would have been very helpful. I like to know if I have the right size wrenches and sockets before starting a project like this. Thanks!
I totally agree. This was an early repair I did and I was just glad to have survived it. I ran into multiple problems (the suspension links that I couldn’t get the nuts off and my impact wrench would not budge the lower strut bolts). As you can see I didn’t get pictures of all the steps. I thought what I could get down would still be beneficial to people. Most of my repairs include the size of the bolt head. Thanks for taking the time to share.