How to repair a 2004-2010 Toyota Sienna Power Sliding Door that will not open or close using the remote
My 2004 Toyota Sienna’s door would not open or close when I used the remote or the inside buttons. It would only work when I pulled the handle. Here is a breakdown of the symptoms I was having with my 2004 Toyota Sienna XLE:
The right sliding door would not open or close if I used the keychain remote (you could hear it try but the door wouldn’t ever unlatch)
The right sliding door would not open or close if I used the push button on the ceiling between the driver and passenger’s seat or the push button on the door post in front of the door (it would be obvious that it was trying to open and would move a millimeter or so but that’s it)
The right sliding door would operate correctly if you physically pulled the outside or inside handles
The slide door lock release motor was getting 12 volts when I tried to remotely open the door
All of this is pointing to the motor inside the door that essentially “pulls the handle” for you when you remotely open the door. Here’s a video of me demonstrating the problem:
How to Fix 2004-2010 Toyota Sienna Sliding Door Will Not Open or Close With The Remote-How to Replace the Slide Door Lock Release Motor Assy
Hardware/Parts Needed:
2004-2010 Toyota Sienna XLE with at least one power sliding side door
Replacement Motor (Only if you want to fix your part, not replace it, see a video on this repair here)
I didn’t replace the motor but if you don’t want to spend the money on the replacement part you can just replace the part of it that went bad, the motor. I don’t cover the motor replacement in this article.
Important: Order two replacement screws (only one comes in each package): Screw, door inside handle – 69296-08030 (because the screws that hold the motor assembly on the door had LockTite on them when they were installed and are almost impossible to remove and the heads strip out easily–I’ve been advised that Toyota techs just cut the heads of them off to remove this part)
5-Piece Auto Trim Panel Removal Tool Set (if you really like tools and want to have “real” door panel removal tools–but you don’t need these, you can use a flat-head screwdriver too)
Dremel Tool (IMPORTANT: I have been advised by real Toyota Repair Technicians that they just cut off the heads of the two phillips head bolts that hold this part on, in order to remove it. I can vouch that they would not unscrew for me either. So YOU WILL NEED A SMALL GRINDER to perform this repair.) I love my Dremel and if you don’t have one you ought to get one and you’ll find many other uses for it once you have it!
Important Note: I’m borrowing some of these images from another repair I did on my van: How to Replace the Power Sliding Door Cables on a 2004-2010 Toyota Sienna
Therefore, some of these pictures will be from the left door and some of them will be from the right door. The two doors are just mirror images of one another though. If the cables on your door fray or the door gets stuck half way open come back to the link above to read how you can do that repair yourself.
A Word of Encouragement
If you are wondering if you can do this repair, please check some of these comments I’ve received from readers who used this guide to fix their Sienna:
This guide was the best written car repair that I’ve ever seen. Showing me how to take everything apart step by step, how to troubleshoot the motor to make sure I was fixing the right thing, plus all of the tips and tricks for how to avoid dropping the bolts into the window were fantastic. Not to mention embedded links in the guide to take me directly to the right parts to order from Toyota. Thank you for putting this much time and effort into sharing your knowledge. You saved me hours of frustration and hundreds of dollars. –Frank P.
Thank you for an awesome guide. I tinker with repairs all the time in a quest to save money, and this might have been the clearest guide I’ve ever used to do a repair. Those coming here wondering if they can do this: Have no fear! –Justin
Thanks so much for this posting! Excellent write up and pictures. You saved me hours of frustration and hundreds of dollars! I just changed both sliding door lock mechanisms on my Sienna. First door took me a few hours because of the screws that held in the door lock motor were stubborn. Ended up using your dremel trick. My second door went smoothly, only took me an hour or so. Thx again. –Matt
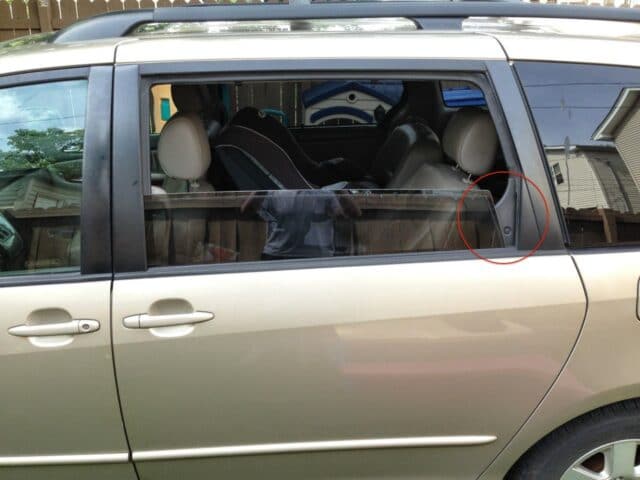
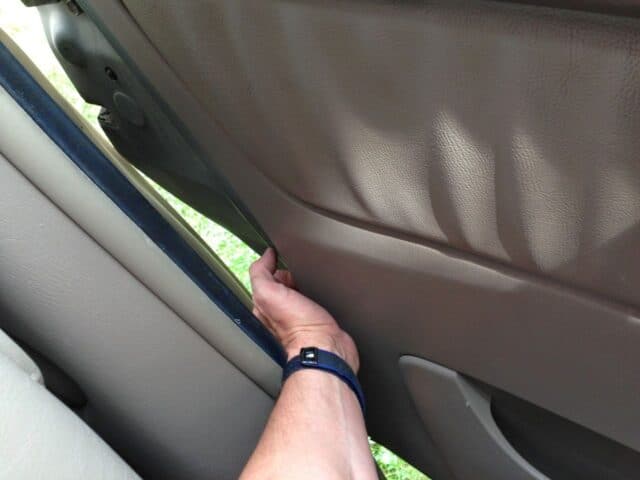
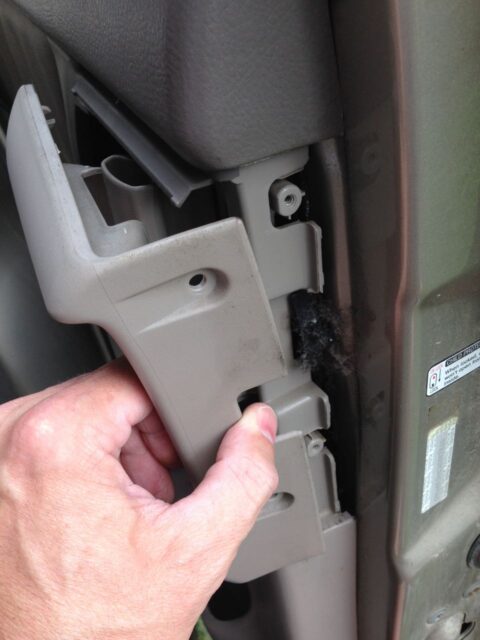
This is the black plastic piece that wraps the lower rear corner of the window opening. If you are looking at the shop manual picture below it is a bit misleading because the image shown is the view from the outside with the window removed and in your situation the window will completely cover it up. If you don’t remove this corner piece you cannot remove the plastic cover from the inside of the door. Lower the window as far down as it will go and pry out the center of the plastic plug in the middle of the clip and then the entire clip will come out–make sure not to lose the center of the clip.
Slide door window garnish as seen in the shop manual (shown as the left door view)
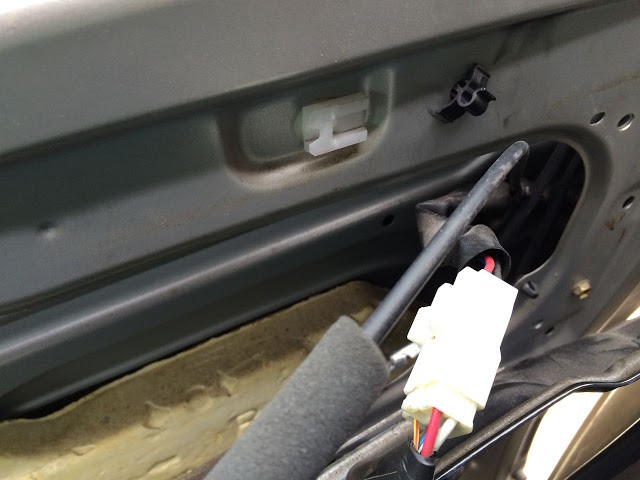
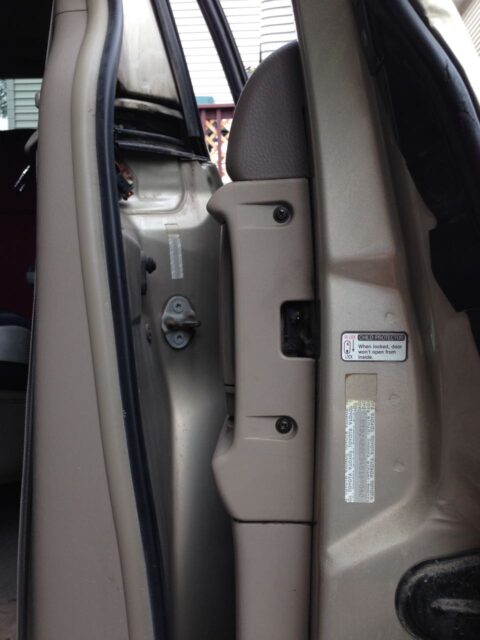
A wide angle view of the slide door window garnish, circled in red:
Left Door: Location of the slide door window garnish
This piece is held in place by a two-piece plug. First use a thin flat screwdriver to lift out the center of the plug as seen below:
Left Door: Slide door window garnish plug unsnapped
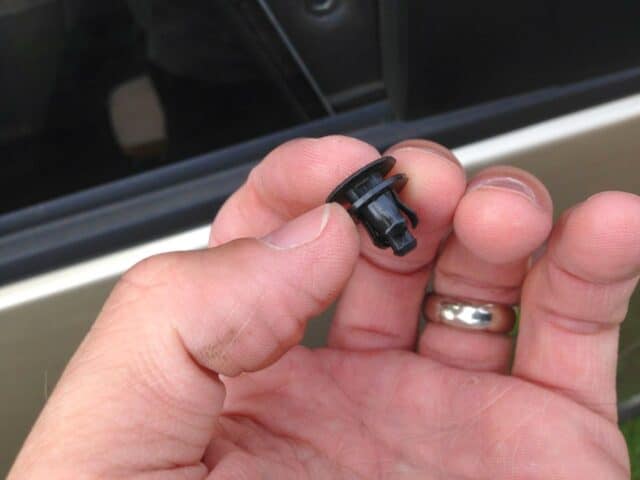
Once you have popped out the center of the plug as seen above then you can take a flat head screwdriver and pull the plug completely out. Here’s what the plug looks like when you take it out:
Slide door window garnish plug removed
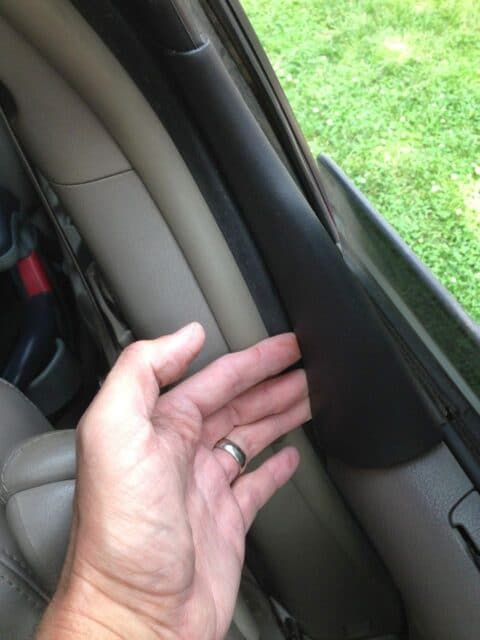
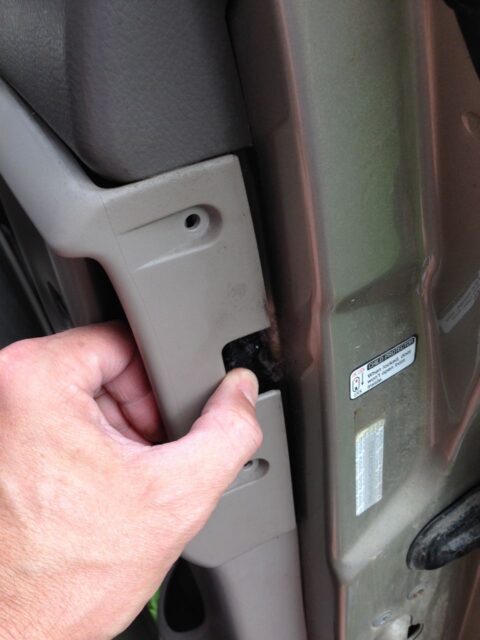
Once you have the plug removed you can pull off the window garnish by getting your fingers under the inside edge and pulling towards the window opening as seen below:
Left Door: Removing the slide door window garnish
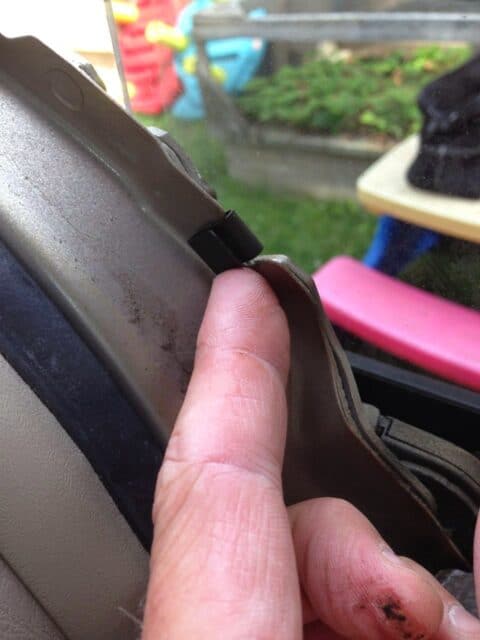
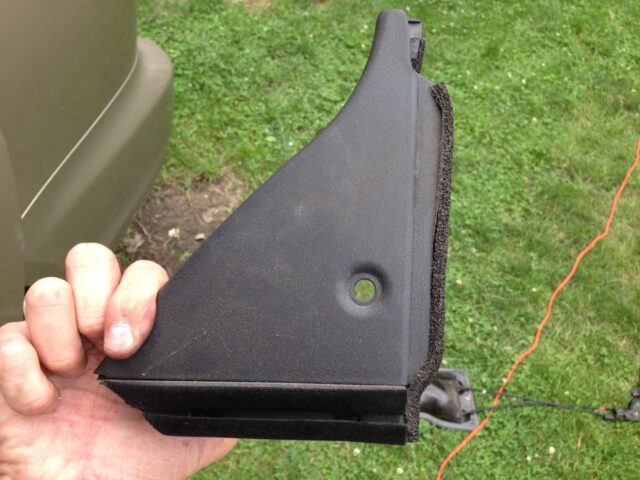
One thing to note is that there are two metal clips that are supposed to stay on the plastic window garnish but may remain on the door or fall off. Place the clips back on the garnish as seen below:
Clip location on the slide door window garnish
One of the clips remained on the door as seen here:
Left Door: This clip stayed on the door
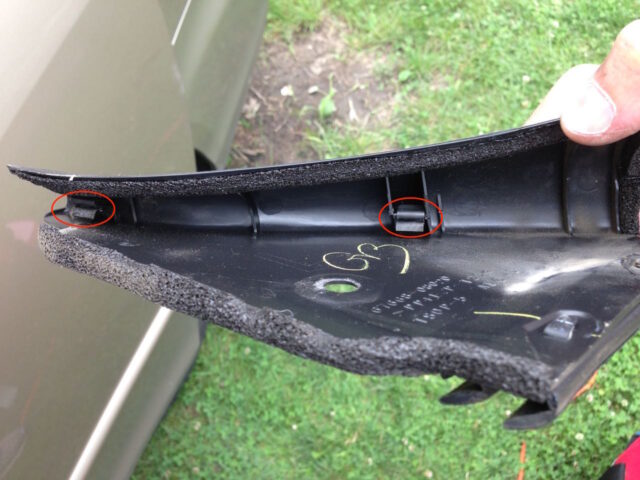
Put the clips back on the plastic trim right away so you don’t loose them but make sure the tab is oriented on the right side (one side is meant to be clipped on the plastic and one side is made to be clipped on the metal door body) like this:
Clip orientation
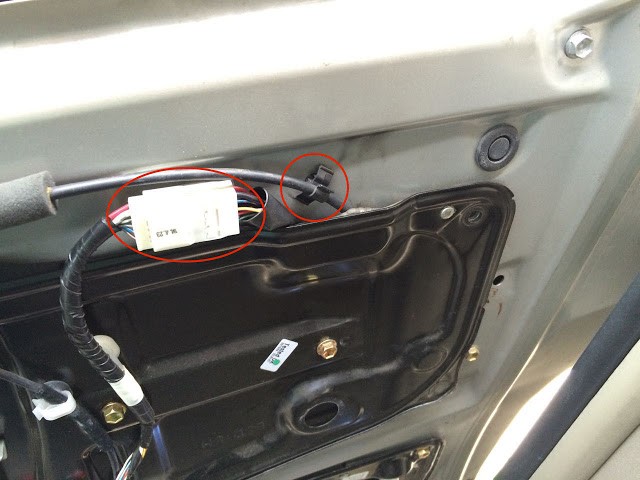
Step 2: Remove the “Side Trim Board Cover.”
This is the plastic piece that surrounds the inside door handle as seen in the diagram below:
Side trim board cover (i.e. the plastic that goes around the inside door handle and window switch)
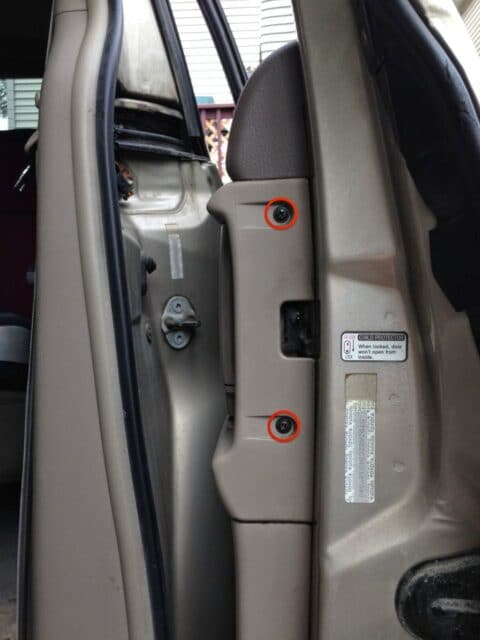
There are 2 screws on the front edge of the door so you MUST be able to get the door open to remove it. At first I was not able to get my door opened but by playing around with pulling the handle on the inside while pushing out on the door (front and back of door) I was able to get it to open.
Left Door: Screw locations on the side trim board cover
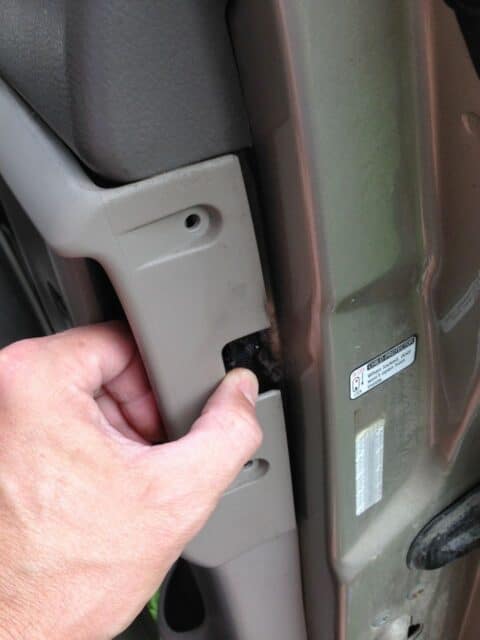
Once you’ve removed the two screws you can pop the cover off by pulling toward the inside of the vehicle at the location shown below (left door):
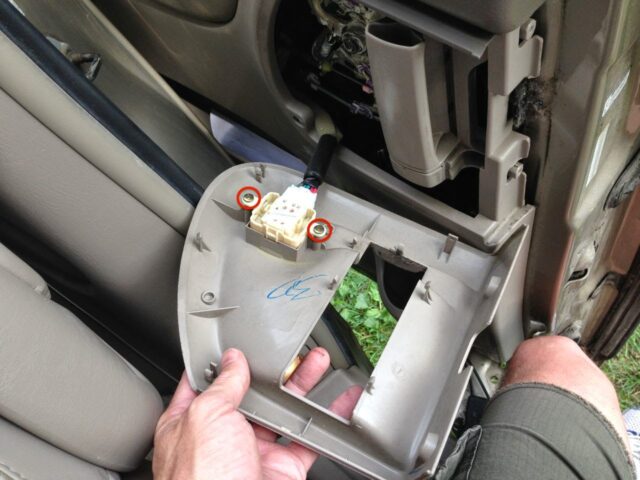
Important: Don’t pull this plastic cover away from the door forcefully. The window switch is retained by the electrical wiring. Simply remove the switch from the cover by removing the two phillips head screws. Reinstall the screws into the trim board cover so you can keep track of them. You need the switch later on in the repair because you cannot operate the window without the slide door’s switch installed (not even by using the driver’s door switch). Here are the switch screw locations:
Left Door: Remove the two screws from the window switch
Note: At some point you will either want to disconnect the positive battery terminal from your battery or simply put the sliding doors in manual mode so you can manually open and close your sliding door as needed to complete the repair. The button to put the sliding doors in manual mode is located at the left knee of the driver:
Sliding door manual button (in manual mode–pushed in)
Step 3: Remove the Rear (side) Door Trim Board Sub-Assembly.
This is the main plastic panel on the inside of the door:
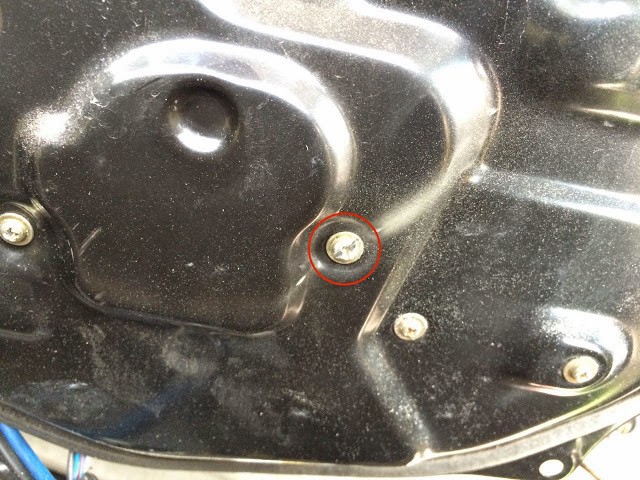
Left Door: The side door trim board sub-assembly and the one screw on the lower edge toward the rear of the van
Important: there is one phillips/hex-head screw at the very bottom rear corner of the trim that must be removed before prying the trim lose. It has a 8-mm nut head on it. I suggest using a socket to remove it. I first tried using my trusty short phillips screw driver but I wasn’t able to put enough force onto the tip to get it to budge. I’d use a socket and ratchet if I were you.
Right Door: The single screw on the side door panel located on the lower rear edge, as seen from floor level with the door open
Here is the diagram of the clips (indicated by dotted triangles):
Left Door: Side door trim board sub-assembly clip diagram (note: this diagram is for the left door)
The first time I did this repair I wrapped a large flat screwdriver with electrical tape and used it to pry up the panel, working my way around the edge. Once all 9 clips are freed then you will lift up the panel and it will lift up and out (it “hangs” from the top). Note: if your van has the built-in window shades you don’t need to mess with them, they come off with the plastic assembly, all in one piece. You can also pop the inner door panel free by pulling on the cup holder like I did the second time I did this repair as seen below:
Right Door: Popping the panel free by pulling on the cup holder
Then I pulled here on the front edge of the inner door panel:
Left door: Popping free the rear edge of the interior panel
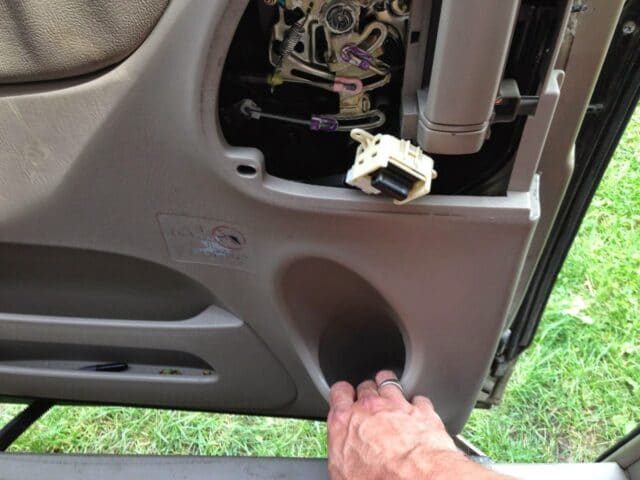
Here’s the panel removed:
Right door: interior panel removed
Step 4: Locate the slide door lock release motor assembly.
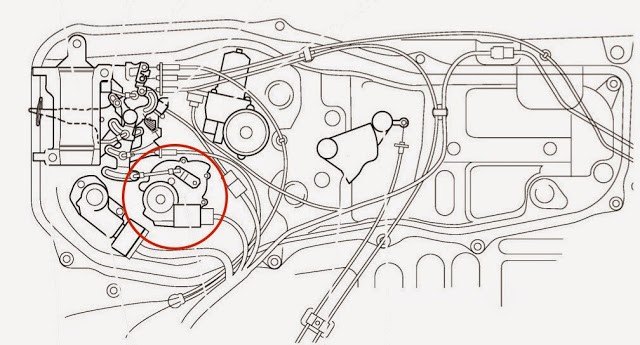
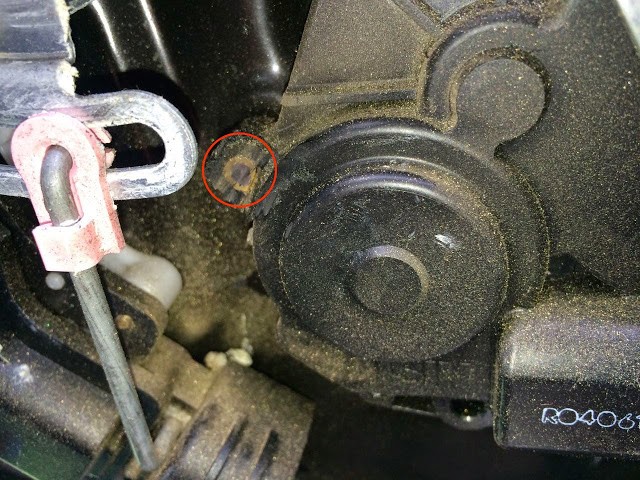
It is located below and toward the rear of the vehicle from the inside door handle and is circled in red below:
Right door: Location of the slide door lock release motor assembly
Right door: diagram and location of door lock release motor assembly
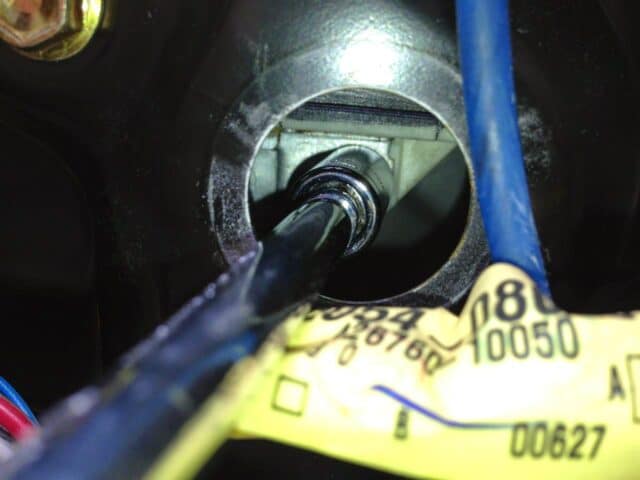
Step 5: Troubleshooting the slide door lock release motor assembly.
Here I am activating the door latch with the keychain remote:
At this point I wanted to know that the motor was getting power. So I disconnected the connector and hooked my multimeter up to the van side of the connector and pressed the remote button. It was getting 12 volts just fine. Here is a video of me testing it:
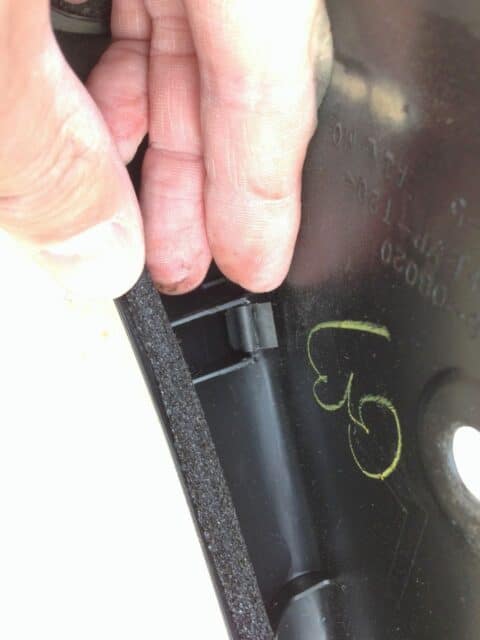
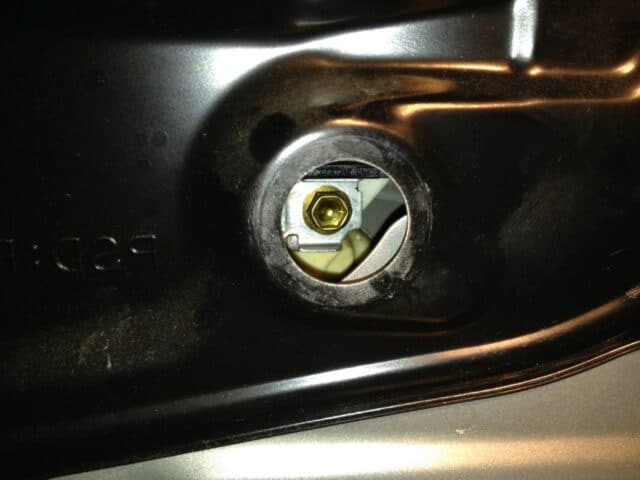
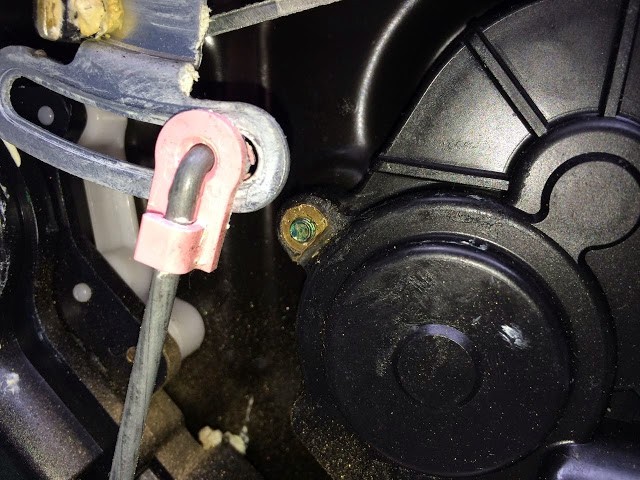
So, because the motor was getting power I determined that the motor was bad. I then looked for where you unbolt the motor assembly and was a bit surprised that the heads of the screws are on the back side (inside the door)! Ugh. Come on Toyota Engineers–don’t you think of the repair guy ever?!?! Here is a picture of the two bolt ends poking through the outside of the part:
Bolt Locations (these are the ends sticking out on the side we can easily get to)
So we are going to need to unbolt the panel that holds all the door and window controls. The problem is that the window is connected to this panel. If you don’t unbolt the window you’ll be lifting up the entire window with this panel and could damage it. I didn’t want to comletely remove the entire window, because that is really overkill for this repair so I opted to go another route–simply unbolting the window and then taping it in the up position and out of the way. Here’s how I did it…
Step 6: Unbolt the window.
Remove the two plastic plugs that cover the access holes. You can pull them out with your fingers:
Right Door: Window bolt access hole plug locations
Window access hole plugs removed
Now adjust the window height so you have the window bolts centered on the holes:
You can line up the window bolts with the holes for much easier removal
If you disconnected the window switch then you’ll need to re-attached it to the wiring so you can roll the window down. I tried rolling down the window with the driver’s door switch but the window will not operate without the door’s switch installed:
Power window switch
Caution: Be careful not to drop the bolts down into the door when you are removing them!! When I did this latest repair I came up with a trick to help keep from dropping the bolts down into the door. The trick is to put some tape up over the edge of your socket so that the socket hole is smaller and the head of the bolt fits tightly into the socket:
Put tape up and over the edge of your socket to retain the bolt when it is loose
With the tape on the socket you’ll need to push harder to get the socket to fit over the bolt, but this is good:
10mm socket on one of the two window bolts
The tape worked great to retain the bolt once it was loose:
The trick worked nicely
Step 7: Tape the window up and out of your way.
Once you have removed the two bolts you can carefully lift the window up (with the door open reach one hand inside and one outside) and I used packing tape to tape it all the way up at the top:
A single piece of packing tape held the window up nicely
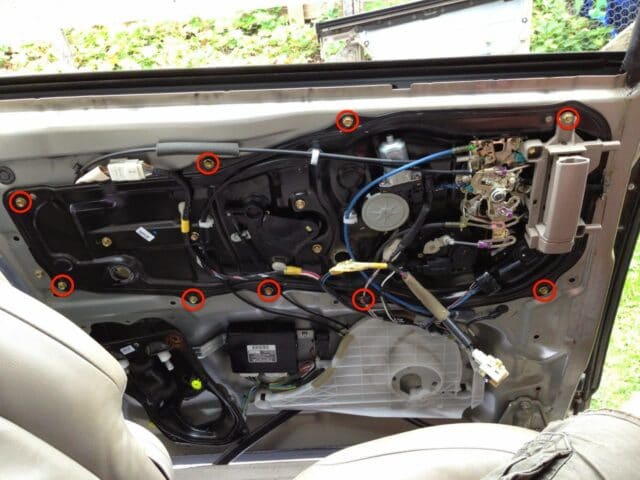
Step 8: Remove the bolts from the black internal access panel (technically called the “attachment panel”).
This will give you access so you can unbolt the slide door lock release motor assembly. When I went to do this on my right door there were only 7 bolts, 2 of which were connected to grounds. DO NOT remove any of the bolts on the inside of the pan, only the ones around the edge as seen in the diagram:
Bolt locations of the internal access panel–note this is for the left door
In real life, circled in red are the 9 bolts you must remove:
Left Door: 9 bolt locations on the internal access panel
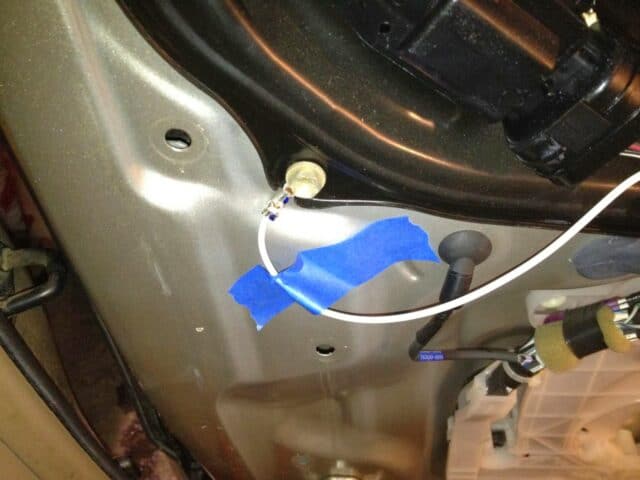
My door was missing some of those bolts, I think I had 7 this last time I tore into this door 🙂 On the right door, which had ground wires attached to bolts, I taped the grounds in place so that I would remember to re-connect them:
One of the grounds taped in place (because I have bad memory)
Take note that the ground bolts are longer:
The ground bolts
You may need to pry the panel away from the door if this is the first time you’ve removed it because there is a foam gasket that makes it stick to the door. Even the time I had to pry it away I was able to do it with my fingers. You are not going to move the panel far from the door because it will still be attached to various other cables.
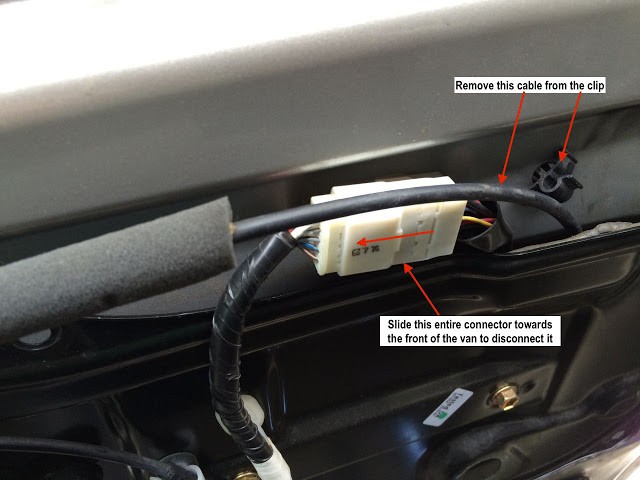
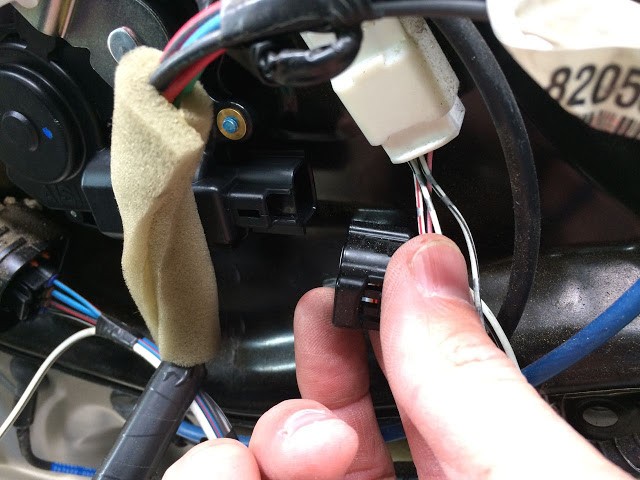
Step 9: Disconnect the electrical connector and cable from the van door.
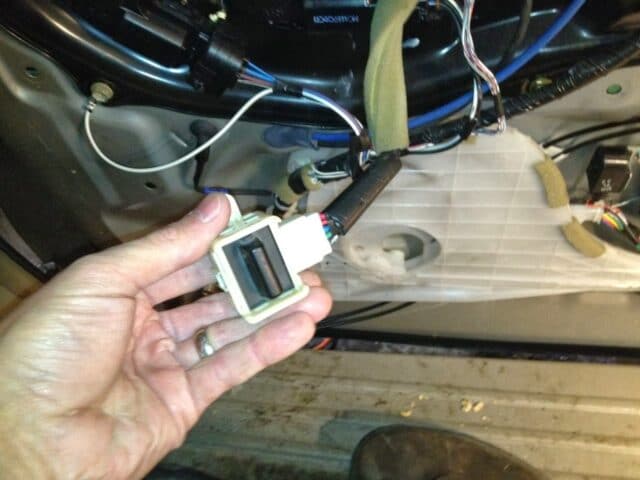
To make it easier to open up this panel and get behind it to unbolt the motor assembly you should unclip the electrical connector from the van (don’t disconnect the two ends of the electrical connector, just slide the whole thing forward to release it from where it is locked into place on the door) and release the black cable from its retaining clip at the top of the black panel:
Release the electrical connector from the van and release the cable from its clip to give yourself room
This is what it will look like with the electrical connector released:
Here they both are released
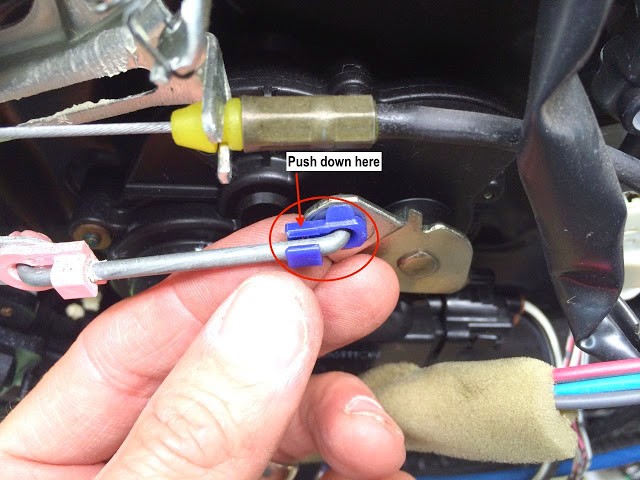
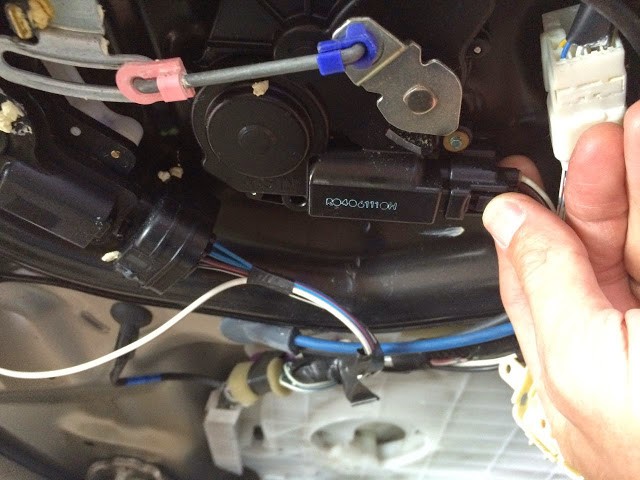
Step 10: Disconnect the control rod from the slide door lock motor.
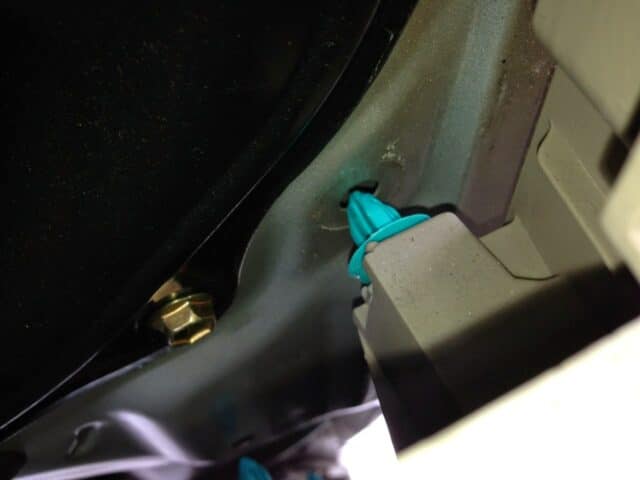
First locate the blue connector snap and rotate it counter clockwise to unsnap it from the motor:
Push down as shown to unsnap the plastic retainer from the connector rod
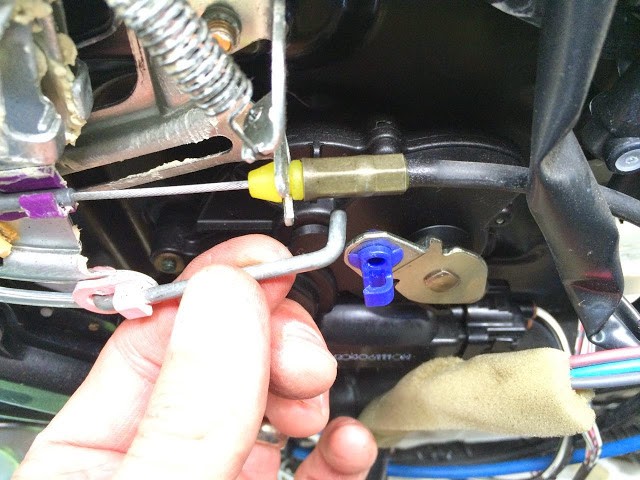
Then it will look like this:
The blue plastic piece has been rotated counter-clockwise and unsnapped from the rod
Pull the rod straight out of the blue plastic piece to release the motor from the control rod:
Here the control arm has been disconnected from the motor assembly
Step 11: Remove the 2 slide door lock release motor assembly screws.
Tip: These screws were almost impossible for me to remove as you can read below. One reader, Justin, generously shared a tip in the comments that I would like to insert here, which may make this step much easier for you: Use a heat gun to heat up the screw (and loctite on the threads) and the screw will easily come out. If that doesn’t work for you, follow along below, but if it does, and your screws come right out, skip down to Step 12.
Another reader, Jed, commented that these are JIS-headed screws, “Japanese Industry Standards” and having the correct screwdriver may aid in their removal. I don’t own one of these screwdrivers but you can purchase them here.
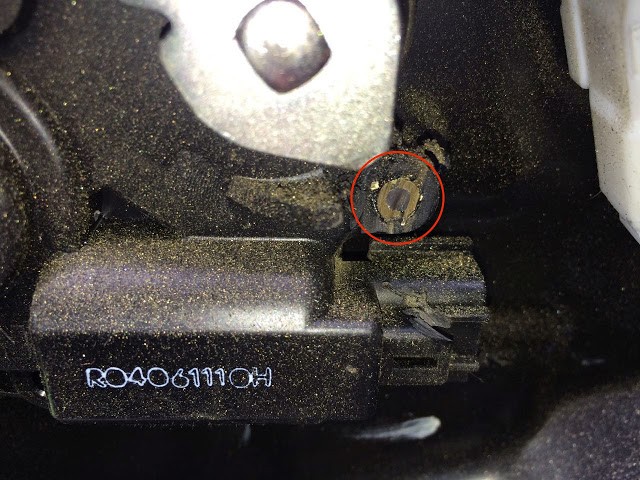
Looking down from the top here are where they are located, on either side of the round indention in the black metal access panel:
Right Door: The two screws holding the slide door lock release motor assembly onto the access panel
You can try to unscrew these but I was not able to. After this repair I contacted my Metro-Toyota.com contact and he asked his techs and they advised him that they just cut the heads off the crews to remove this part. So I wouldn’t sweat this too much, I’d take your Dremel Tool and just grind the head off of each one. I had to learn a harder way and this is what I did… First the phillips head stripped on me so I cut a flat slot in the heads with my Dremel Tool:
Here I have used a cutting disk on my Dremel tool to make a slot for a flat-head screw driver
Even after cutting a slot in the head they still would not come out, because the nut end turned with the bolt that is imbedded in the plastic. I tried to hold the other end still, first with a vice grip, then with a flat screw driver, and then with a chisel:
Right: I used my Dremel to flatten one side and then wedged a screw driver in there to attempt to hold it still, to no avail
So after failing to be able to hold the other ends still with a vice grip and a chisel, I took my Dremel tool to the other side as well:
Right Door: The left side “nut” end ground off smooth
Right Door: The right side “nut” end ground off smooth
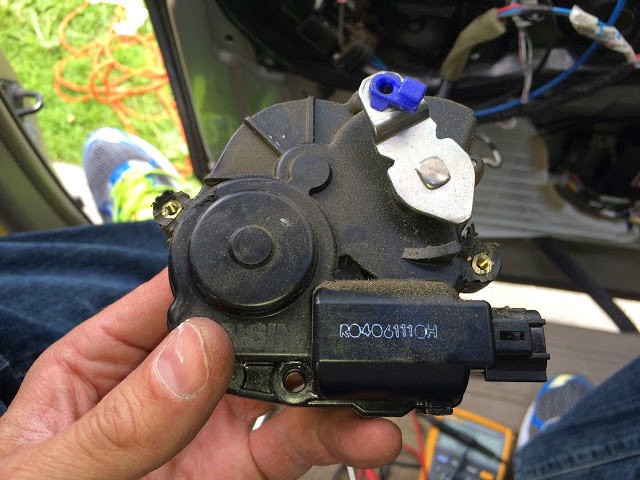
Finally, after that I was able to remove both screws and the door lock release motor assembly came free:
Right Door: Slide door lock release motor assembly removed, finally!
Step 12: Reinstall the 2 phillips-head screws into the new door lock release motor assembly.
The new assembly will not come with parts so if you had to destroy the old screws like I did, make sure you order them (or order them in advance just in case if you didn’t remove the part before ordering parts).
The two new screws inserted into their holes
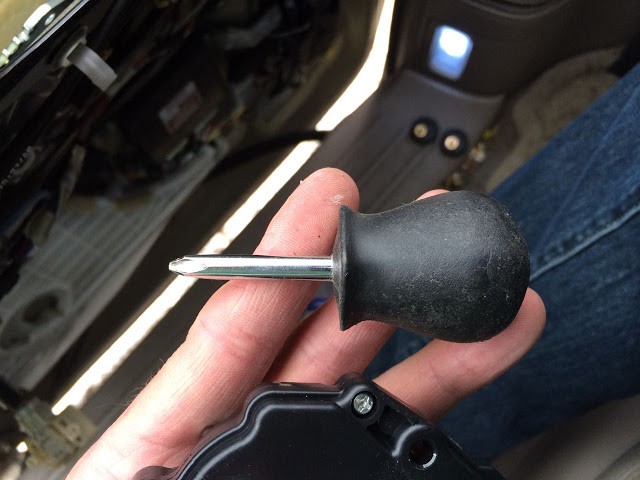
I started them by hand to make sure I didn’t cross thread them. My stubby screw driver came in real handy at this point since there’s not room for a normal length screw driver:
It helps a lot to have the right tools and my stubby phillips-head screw driver comes in handy on this step
Step 13: Reconnect the control rod.
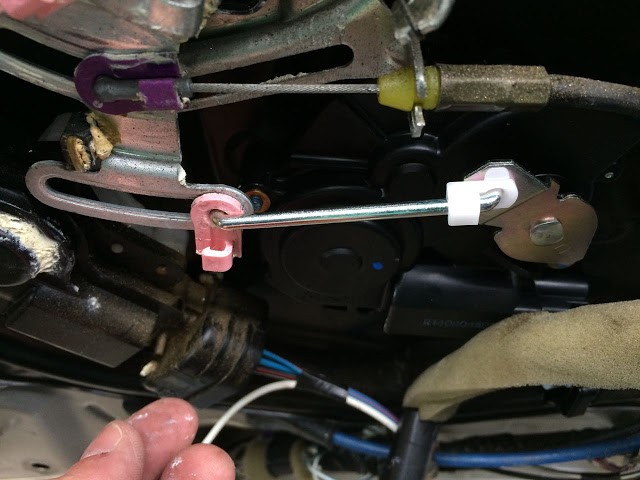
The new part comes with the control rod so you can use the old one or the new one. I used the new one. Insert the end of the rod into the blue plastic piece. This is what you should have:
Insert the end of the new control rod into the pink plastic piece like this
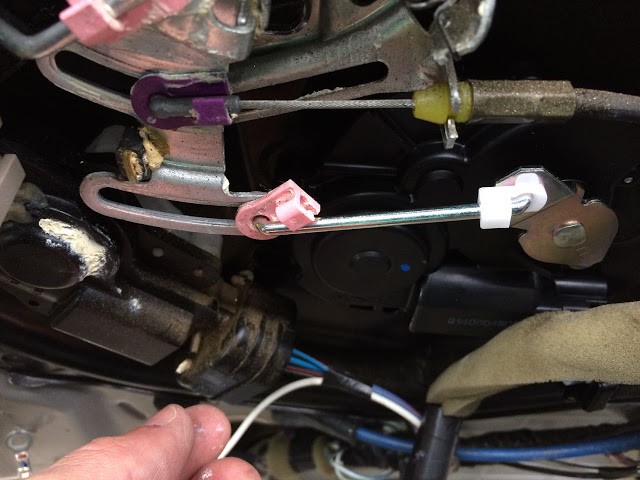
Now rotate the pink plastic piece in a clockwise rotation to snap it on to the horizontal part of the rod. If you cannot rotate it around then pull the rod out, re-locate the blue plastic piece and then try again. This is what it will look like when it is properly locked in place:
Rotate the pink plastic piece clockwise
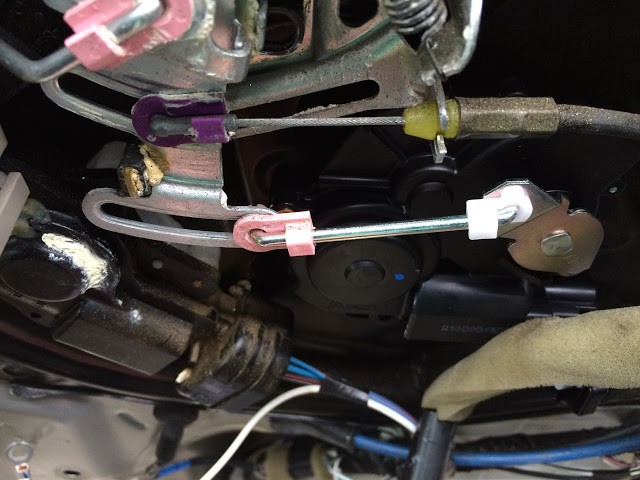
Snap the pink plastic piece down onto the rod
Step 14: Reconnect the wiring connector to the door lock release motor assembly.
Reconnecting the wiring connector
The connector should snap into place:
Right Door: Reconnect the slide door lock release motor assembly wiring connector
Step 15: Reattach the electrical connector and cable at the top of the access panel.
The electrical connector just slides on towards the rear of the van.
Don’t forget to put both of these back in place
Step 16: Reinstall the the bolts into the metal access panel.
Diagram of the attachment panel
Step 17: Reinstall the 2 window bolts.
Use my electrical tape trick I shared in Step 6 so you don’t drop the bolts down into the window. You may want to add another layer of tape if the bolts don’t fit tightly. Don’t forget to reinstall the two rubber plugs after tightening them up.
Step 18: Test the repair.
At this point you should be able to test the door by pressing the button on the remote or any of the other buttons on the van. Make sure the power sliding doors are enabled by the drivers’s left knee on the dash (the button should be popped out and the orange should show). Here is a video of mine after the repair:
One thing to note about the video above is that normally the motor would have to release the latch right before the door shuts (as well as right before it closes) but for some reason Toyota has designed this door so that the door does not lock in the open position when the window is down and I had the window down when I shot this video (I’d forgotten about that).
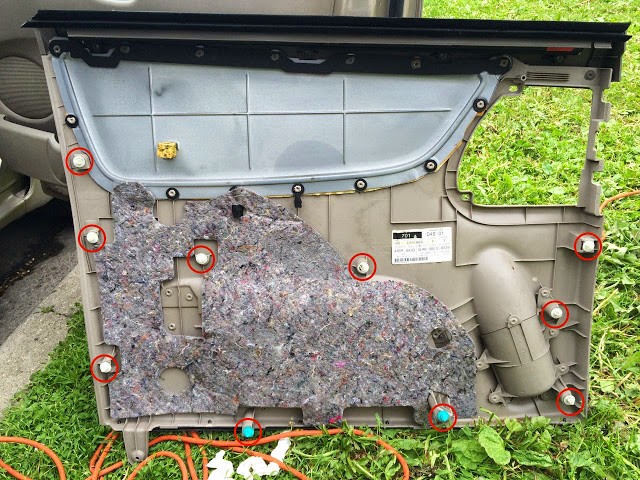
Step 19: Reinstall the interior trim of the sliding door.
Before you go to put it on make sure all the clips are in place and not broken. There are 10 of them and as you can see from the image below, I have had to replace the bottom two (the blue ones). You will almost always break some of the plastic clips that hold the trim in place so I ordered a bag of them from amazon (link for a bag of 25 of them here). A word about snapping them all in place: if you don’t have them snapped all they way in they may not line up with the hole they are supposed to snap into so make sure none of them are out of place.
Location of the 10 clips on the back side of the sliding door panel
Make sure there are no clips still stuck into the metal body of the sliding door of the van:
Use a screwdriver to remove any clips that did not come out with the door panel
Hang the top of the interior trim on the top edge of the door–it should fit snug against the window. Look along the edge of the trim to see that the snaps are lining up with their holes and then start snapping the trim on the metal door frame.
Line the snaps up with the holes before pressing (or banging) on the door panel to snap back together
Finally, don’t forget to reinstall that one sneaky 8mm head screw at the bottom rear of the door:
Left Door: Reinstalling the lower screw
Step 20: Reinstall the “Side Trim Board Cover.”
Reinstall the window switch screws.
Reinstall the two window switch screws
Snap the trim board back into place:
Snap the Trim Board back into placeSnapping the trim board back into place
Reinstall the two screws on the edge of the trim board as seen below:
The Trim Board Screws Reinstalled
Step 21: Reinstall the “Slide Door Window Garnish.”
Reinstall the window garnish
Make sure that both clips are in place before snapping it in (they could have stayed on the body of the van when you removed it):
Make sure the clips are in place
Align the piece with the hole and snap the plastic clip back in place:
The window garnish reinstalled
Step 22: You’re Finished!
Now you’ve saved yourself hundreds of dollars! Good work. Please let me know in the comments if you have questions or if you’d be kind enough to share with everyone that you were able to complete this repair–it is encouraging for others to hear you did it yourself too!
Amazon Associate Disclosure: As an Amazon Associate I earn from qualifying purchases. This means if you click on an affiliate link and purchase the item, I will receive an affiliate commission. The price of the item is the same whether it is an affiliate link or not. Regardless, I only recommend products or services I believe will add value to Share Your Repair readers. By using the affiliate links, you are helping support Share Your Repair, and I genuinely appreciate your support.
I used a multi tool to cut through the plastic near the screws and got the old actuator assembly off. I then used the multitool to cut through the screws (the heads fell off into the door). I then replaced by running a zip tie to secure the new actuator. Piece of cake.
I just did this repair today, and I can’t say how thankful I am for this repair guide from John. Thanks for these precise and clear instructions. My repair went off without a hitch, and I was even able to get the two screws off from the back of the motor assembly with just a Philips screwdriver. I realize that this is probably an anomaly, but before I went to grind off the screws I decided to just try to unscrew them. I had the panel off far enough to fit in a screw driver with enough torque to unscrew them and, voila, off they came. Was definitely also grateful that I purchased the extra door clips since many of mine broke off when I took the panel off. I plan to do the driver side door next week!
I do have a question: the left/driver side sliding door on my 2005 XLE Sienna will not open/close with any buttons, and will also not open or close with the door handle. I can hear motors turning and trying to do something, but nothing happens. Unlike the other door that would at least open with the door handle, this one is basically a heavy manual door. I plan to replace the Slide Door Lock Release Control first, and then if that doesn’t fix it, move on to the motor. What are your thoughts?
Matt, I’ve never had to deal with a door that will not open so I don’t know what to tell you. I don’t have this version of the van anymore so I can’t even look at it to see what I might do. There is one screw on the back edge of the door that you’d need to remove to get the inner door panel off. I’m not sure if there is a right-angle phillips screw tool that could get that screw out.
Thank you for the wonderful instructions, I ended repairing the problem for about $10 by buying only the small internal motor and a few machine screws/washers. I love the electrical tape trick!
A couple of things I did
1) Once the Phillips head screws stripped (which I expected) instead of dremeling off the head (didnt want to do this because I only planned to replace the internal motor) , I used the dremel to cut a deep slot in the stripped head, and a flat head screwdriver unscrewed them (i think the dremel cut had the side effect of heating the loctite and they came out super easy.)
2) i replaced the screws with some 4mm machine screws with hex heads and lock washers, much easier to remove in any future repair using a socket..
I checked the resistance of the sensor and it does not show normal values. Indicates that the sensor is constantly under pressure (150 to 175 ohms). Can I buy a resistor that gives the same normal values and bridge it instead of the sensor, because there is no sensor in Montenegro for Sienna?
I cannot recommend bypassing a safety device which could close on a person’s body part or even a child’s neck and the door wouldn’t know to open back up.
First of all I have to thank you for your patience and advices you are giving me.
I have only one sensor, at the passenger side door, the driver side is manually. I will try to check resistance with no ohmmeter.
In any case I will let you know the result
When I try to open the door I get 12v and the door opens without error but when I try to close it they are “dead”, without voltage.
I checked the fuses but they are correct, as are all the relays on the COMPUTER MULTIPLEX NETWORK DOOR.
I do not know what other conditions must be met in order for the closure operation to start.
I just noticed that door touch sensor is pinched at few places. Can it be that that’s the problem? I know that that sensor is preventing door to close. I guess when pinched it sends the wrong signal to the computer (that the door is constantly obstructed) and therefore turns off the power needed to close.
If that door sensor was damaged it could definitely create the problem you are having. You can test the theory on the other door by squeezing the sensor and seeing if the behavior is the same.
Because I removed the panel from the door, I disconnected the connector, then checked the connectors with a voltmeter while pressing the button. I didn’t get 12v. But I find it weird that the opening works without a problem.
Ok, thank you. I wanted to make sure you didn’t assume it. Did you see 12v on that same pin when you attempted to open the door (with the connector disconnected)? You must use the body of the van as ground or your multimeter will not measure the voltage. The reason I ask is because some of these circuits must be connected in order for them to perform. Testing them would require the motor connected and then for you to either probe the pin on the (connected) connector or pierce the insulation on the wire (I recommend the former option). If you do see 12v when opening the but not closing, the multiplexor circuit which supplies the signal could be bad but I’ve never heard of that being the case. You need to systematically eliminate the possible causes.
I am contacting you about a problem with the power sliding door on the 2006 Sienna.
When I press the button to open the door, it opens without any problems, but when I try to close it, the power door lock actuator (passenger side) does not get the required 12V.
Basically:
When door is CLOSED all buttons, key fob, handles work to OPEN the door automatically.
When door is OPEN all buttons, key fob, handles do not work – door only closes manually.
Can you give me some advice on what might be or what can I try?
John, thank you for the great instructions for changing the Sienna sliding door actuator motor. Everything went well, I ordered the replacment screws, and the motor via your links. I used a heat gun, 15 seconds on each and they unscrewed just fine. The only mistake I made was closing up the door panel without pulling the window switch out first, I unpoped the door and did it again. Anyway, all in all 2 hours time well spent. Thanks again for your instructions.
Search for my comment in the cable replacement repair dated “James Booth
03/28/2017 at 2:16 pm”. After using a multi tool to cut the tab at the bottom of the door, and around the handle trim, you can take the panel off and reach inside the door to open it.
I’d like to help Don with removing the panel so he can get access to the insides. I fixed mine 3 yrs ago so my memory is foggy. But you can use a multi-tool to cut the tab that holds the bottom edge of the panel to the door. I think that frees it up enough so you can then pull the panel away to get inside. I posted on this back in Dec 2018 but I don’t see it in the comments. I know I was able to reach into the door toward the back edge with the window partially lowered. I could grab a cable or latch back there that let the rear of the door come open, and then something else to release the front latch.
Impressive information John, I have a circular problem. On a 2010 Sienna I can’t get the driver side sliding door open to access the trim panel attachments to access the internal parts to get the door open.
The cable broke a while back and I cut the whip end off. We used it manually for a while. Then it became non-responsive. Inner and outer handle do nothing, electronic controls do nothing, no motor or solenoid sounds. I tried holding the outer handle “open” and body bumping from inside – nothing. Inner handle and lock feel disconnected (no resistance to movement) and I am out of ideas on how to gain access. I have an aftermarket cable assy on hand and figure i will need more parts once I can get it open. Most I have been able to get off is the window trim.
Any ideas on how to get the door open so I can start the work?
I don’t have a solution for you although I’m sure there is a way. The handles pull a cable that unlatched the front and rear latches of the door. The electrical switch and the hand latches all come together into one place inside the door so it something is broken downstream from there you will bend to find a different way of getting inside the door panel to actuate it. Make sure to try bumping the door open with tour body after using the door switch buttons if the handles don’t work. That’s all I can offer, sorry.
Hello. My 2013 Toyota Sienna passenger side sliding door will only close with the remote every other time. I have had it looked at several times at the Toyota dealer but they can’t find out the problem and can’t fix it.
I was so excited to see such a great step by step troubleshooting guide 🙂 Obviously taking this to Toyota is just way too expensive so I was hoping that you might have some ideas on what to look at.
I am not sure where to ask you this question as I don’t know if it’s a wiring harness or the actuator I may send it to both.
It’s a 2006 Sienna with passenger power sliding door issues. 2 issues: when you activate any of the switches to shut the door it does move and try to close 1) it is very slow and gets slower 2) as the door shuts and engages the locking mechanism it only locks part way. I believe it is a two stage door closing process. The first engages the front lock and the second pushes the rear of the door into the body. So there is only one click heard instead of the standard two. Front engages and rear doesn’t close all the way.
I’ve heard wiring harness and have heard about the motor. I really would like to help my parents fix their van. Any thoughts?
Thanks
I have not had that problem on my van and have not worked on the powered close mechanism so I’m sorry that I can’t give you any advice, yet… who knows, I may be due to have the same problem eventually.
I’m planing to a new part with 2 screws. How about I drill the 2 screws from my side even if could damage the old part? I’m going to through the old part anyway.
Well, the work described in this article seems much more sophisticated than this one. I’ll study this further to decide if I want to try or not. Thanks.
Hey, thanks for the fast response.
Actually, inside handle and the black button works just fine.
Taking off tha panel seems to be a good idea. I guess I’ll definitely be able to “see” the problem I have.
The fact that only the outside handle does not work makes it pretty certain that something is going on with the cable that connects the door handle to the latching hub. This tutorial and my How to Replace Power Sliding Door Cables on 2004-2010 Toyota Sienna article should show you almost everything you need to do. You may need to remove the window to get to the bolts that attach the door handle to the door. Let us know what you do and how it turns out.
I’ve reviewed and prepared for the repaire myself, but just before I try to be sure if I am having the exact problem, I am quite confused.
I have a 2010 Sienna, and its Sienna sliding doors seem to open very well with the indoor door open button. I am having problems with opening the door when I try to open with the outside handle. I feel that my car’s symptoms are quite opposite of what’s described.
Do you think I should still go on for the fix or search for some other causes?
I have some questions. When you say, “seem to open very well with the indoor door open button” do you mean the handle or the black push-button on the front door post? If you mean the black button on the door post, then this article will not solve your problem. If the outside handle will not open the door then you may have a broken handle. That handle, when you pull it out, pulls a cable. Where that cable attaches to the handle may have broken. You can always follow the steps in this article to remove the inner door panel and then run the door through its paces and you will be able to see what is going on. That is what I would probably do if I were in your situation. It’s only about 10 minutes work to get that inner door panel off. Don’t forget that screw on the bottom back edge of the door.
Good info! I did this with the digikey motor instead of replacing the actuator. It went well. I ordered these 2 screwdrivers from amazon https://amzn.to/2wQIIfR and https://amzn.to/2oLo7Fk. The digikey motor was $10 shipped. So for $30 it is finished and I have 2 new screwdrivers. I did NOT have to do anything to get the 2 screws out, just apply firm hard proper pressure to the screws with those new screwdrivers, but it was on the edge, I would order the 2 screws if I ever had to do it again just in case. To re-insert the screws I cleaned them off with a wire wheel and used a tap to clean out the threads. It all works perfect now.
Thanks! I was finally able to remove the screws successfully by heating them up quite a bit (several times – like it isn’t hot enough already outside in my garage) and using pliers to rotate them out. Not easy!!!
Now, I don’t see specific instructions on how to release the motor assembly cable from the door (so I can work on it in A/C). I would like to separate it but I’m sure there is some sort of release mechanism for it. Please help.
Sorry – I’m not sure I understand. I only bought the replacement motor, not the whole assembly. If I drill off the screw heads, will the whole assembly still come off and then I can open it up and replace the motor at that point? Will this work?
Ok, I understand your predicament now. If you want to get the screws out of the assembly so you can swap out the motor, then you will need to heat up that screw to release the thread lock. I haven’t done this so you’ll have to feel your way through it. I can tell you that the screw threads into a threaded cylindrical metal piece imbedded into the injection-molded case and that cylinder will turn inside the plastic if you get it all too hot. I had the cylinder turn just by cutting a new slot in the head of the screw and applying a bunch of force. Hopefully the thread lock melts before the plastic.
In the middle of this repair and struggling to get the 2 screws out with the loctite on them.
Tried:
1) Used a special MAZO drill bit to try to drill the screws out – tore them up a bit
2) Borrowed a friend’s Dremel 4000 and bought the reinforced discs and cut out the back end of the screws (hit a few things in the process that hopefully won’t impact door operation). Also tried to Dremel the heads of the screws to flathead style to help get the screws out. Still could not get them out.
Next steps:
3) Should I go buy a heat gun and try hitting the screws with high heat to see if melting the loctite will help and pull them out after? What’s the best tool to use at this point with these beat up screw heads?
4) Other ideas?
Peter, thanks for the question. If you purchased the replacement part, I recommend using your Dremel to completely grind off the heads of the screws. By heads I mean the parts that are circled in red in Step 11. If you remove the screw heads then the part will be completely freed, given you disconnected the wire linkage in Step 10. Let me know if you have any other questions.
Thanks for posting this! I did the repair on my Sienna today but opted to replace just the motor (which I ordered from Digikey) in lieu of the entire assembly. I’m calling my repair 95% successful…
After I had everything put back together I started having problems with the automatic door button that’s next to the sliding door. I can’t open the sliding door with the button, but I can close the door. If the door is closed and I press the button I get absolutely no response. I find it odd that the button works fine when closing the door but is dead when trying to open it. The key fob and driver buttons work fine though…
If I were you I would take the inner panel of the door off and then run the door through the paces and watch what happens when the door won’t open when you push the button. I think you will be able to see what is going wrong. Check back in and let us know if you are able to fix it.
John I did not get voltage on the lock release motor connector of my 2008 Toyota Sienna. Do you have an electric wiring diagram of the sliding door that would help trace the problem?
I didn’t think to take any pictures when I installed the Digikey motor in my Sienna two years ago but I found a YouTube video of a guy who shows how to do it. It’s the same process I used.
I just read your instructions for this repair. I wish I had seen them two years ago. I fumbled my way through the repair and eventually replaced the old motor with the $5 replacement from DigiKey.
One thing I did differently. The screws that you mentioned stripping are not standard Phillips. That’s why they strip so easily. You need to use a JIS screwdriver (Japanese Industry Standards). They are not the same as Phillips. I used a heat gun to soften the loctite and a JIS screwdriver and I did not strip the screws on either side.
If people want to attempt to get the screws out without stripping them then hopefully this helps.
To be safe though, I would still recommend people follow your advice and order the replacement screws.
I inadvertently posted my comment above in the wrong repair. The comment above was actually meant for your other sliding door repair. I will go over to that repair and add a comment with the picture that shows the clip. Sorry for my error.
You can delete this comment from this repair if necessary.
Fantastic write-up! I used your directions to fix the driver’s side and will soon be tackling the passenger side.
I have one thing to add. While removing the old sliding door assembly from the door I broke one of the little black clips that holds the two plastic rods on the sliding door assembly.
The part number for the clip is 90467-13046. It’s about $2.
Also, another person mentioned they stripped the middle bolt that holds the window bracket in place. I did the same so be careful when reinstalling this bolt. A quick trip to Ace hardware and I was able to piece together a solution.
John – I have a sliding door that won’t completely close. The cables broke some time ago and it’s been used manually since that time but recently the door quit closing all the way at the rear end of the door. I believe when you get to the final 1/2″ of the door latching a motor kicks in and draws it in the rest of the way. I would be glad to get this door to shut and never open again if I could figure out how to get this to close completely. Any suggestions would be appreciated. Thanks!
There is a motorized lock assembly that pulls the rear edge of the door shut. I have no experience of working on this motor but it can be seen in this diagram:
I have a Sienna 2004 XLE I am looking to replace the OEM TOYOTA SIENNA SLIDING DOOR LOCK PASSENGER SIDE 69050-08040 FITS 2004-2010 but can not find any tutorials. Can you help? Will I have to take the entire door off to access the cables? Thanks.
Thanks for the quick response. I’m sorry that I wrongly described the first point. I meant: 1. The door’s POWER does not respond to the door handles for opening or closing unless I move the door a little, then the power starts and takes over. I did verify that the fuses, #14 under the hood and #39 under the dash, are good.
Sorry for the duplicates replies, could you please remove them. Thanks
Thanks for the quick response. I’m sorry that I wrongly described the first point. I meant: 1. The door’s POWER does not respond to the door handles for opening or closing unless I move the door a little, then the power starts and takes over. I did verify that the fuses, #14 under the hood and #39 under the dash, are good.
Thanks John for this awesome tutorial. I have a 2008 LE Sienna, and the passenger power sliding door has a problem which is a little bit different. The symptoms are:
1. The door DOES NOT RESPOND to the door handles for opening or closing UNLESS I move the door a little, then the power starts and takes over.
2. The door responded to the key fob and the electric buttons, HOWEVER, wouldn’t open or close UNLESS I UNLATCH IT MANUALLY by grabbing one of the door’s handles.
3. I removed the door panel and I the latch actuator does not receive power when I push any of the electric buttons.
I’m wondering if the problem from the door ECU or the door needs to be reset or there is something else!
Any idea or suggestions?
Thank you
Thanks for the question. The symptoms are strange in that in your point #1, the door doesn’t respond to the handle, but in point #2 it doesn’t respond unless you pull the door handle. We need to start eliminating possible causes. The fuses that cover the sliding doors are #14 and #39 as detailed in my article: Toyota Sienna Fuse Locations. Verify that they are good. Check back in and let us all know what you find.
John – I am preparing to sell my 2008 Sienna and guess what popped up? My right sliding door would open but not close using the remote or buttons. I pulled the the door panel and disconnected the lock release electrical connector and checked for power and it was fine. I suspected the lock release assembly was okay, but wondered if it was not getting power because the power connector had come loose. Three small cable ties around the two connector parts and the right sliding door worked fine! My Sienna has a slot/tab type of connection which made me guess that parts might separate. Upon close examination I noticed the slot had been torn and the tab could pull through. This may be the only case of this happening, but it happened twice after the initial replace of the assembly. It seems like there is some type of pulling on the power connector that allowed them to separate and I wasn’t able to determine what caused them to pull apart. Thanks again for your help on this and other Sienna repairs.
This guide was the best written car repair that I’ve ever seen. Showing me how to take everything apart step by step, how to troubleshoot the motor to make sure I was fixing the right thing, plus all of the tips and tricks for how to avoid dropping the bolts into the window were fantastic. Not to mention embedded links in the guide to take me directly to the right parts to order from Toyota. Thank you for putting this much time and effort into sharing your knowledge. You saved me hours of frustration and hundreds of dollars.
One pro tip: remember to unlock the door when you want to test it! The door must be locked to get the side trim board cover off. I had a few minutes of terror when I couldn’t get the door to work after my repair, because I forgot that the door was still locked 🙂
Well thanks for the feedback Frank, I appreciate it. Good work on repairing your van–I bet it felt real good when that sliding door finally opened on its own again!
That was exactly it! It was the windows! The first door, at first, I tried taking off the panel without removing the window trim piece (some other youtube videos showed that) but that didn’t work. So I followed your instruction – and had to lower the window, and sometime after that noticed the bar preventing the door opening fully! And then on the second door, I lowered the window and same thing. Looking at the shape of the piece and analyzing the mechanics, I knew there had to be something that would rotate the plastic piece, and I tried troubleshooting it… but just hadn’t thought of the window! So thanks again… BTW, you are truly dedicated… I cannot believe how prompt you have been with the replies! Thanks!
And here’s maybe my bit to return your favor a little… I think the door is prevented from opening fully when the window is down, as a safety mechanism… in case a kid is sticking out their head, to avoid injury/death. There is enough opening left even with the door fully open that a hand sticking out would not be crushed, but a head certainly could, so Toyota designed it to prevent opening fully and leave enough gap.
Reg the actuator motor – I ordered just the Digikey motor last night (this morning) at 2am (around the time I posted my last comment)… couldn’t go to sleep without a plan forward 🙂 I’m keeping my fingers crossed that this is it and fixes the issue. Don’t wanna spend too much on this car at this time if we can avoid it… ironically, 3 months ago, we were thinking of replacing our Sienna with a smaller car, but couldn’t really go ahead with it (partly because I’m tall, and my son is almost getting there, so a “small” car wouldn’t really work, and we already have a CRV)… so we invested in some significant things in the Sienna: front wheel bearings, hubs, then the radiator started leaking, we’re replacing the front brake rotors and pads, and getting new tires… and we thought that would hold us for a while, and last night the door broke!
John,
Just wanted to share an update – so the DigiKey motor arrived on Wed and I took the rest of the door apart to put it in. MAN – the 2 screws to remove the actuator part were SO PAINFUL – it took an extra 2 hours just to manage the screws! Long story, but I ended up removing the metal cylinder inside the plastic housing on both sides, and just put in new screws (maybe long electrical switch screws) with nuts to hold it. Really not sure why Toyota designed the part to be screwed from the inside, and why they used such terrible screws.
Anyway, the repair was completed successfully and the door now works! Thanks for your help!
John, thanks so much for getting back so quickly. So I did more comprehensive troubleshooting, and it does look like the actuator motor is bad – all electronic ways to open/close the door fail, but mechanical ways (pulling the outside or inside handle *fully* work (a soft pull does not work because its the same as electronic). So I’m thinking of replacing just the motor inside the assembly (found references to the $5 DigiKey motor replacement) – any advice/thoughts on that?
Also, I noticed another problem develop, and am not sure if it is related to the motor going bad. The door does not fully open – it stops a little short at the end (stays there). Looks like there is a metal bar at the bottom of the door that is now protruding that is in the way and it blocks the door from opening fully. If I hold this metal bar back while the door is opening, the door opens fully and the “U” shaped metal assembly next to this bar correctly engages and holds the door open. This bar is connected via a spring loaded wire that is connected to a plastic part mounted on a metal rotor roughly in the center of the door. It looks like this may rotate, and then the wire would pull less and that engages the metal bar and keeps it out of the way allowing the door to open fully. I didn’t do anything to that part to cause this. So I thought, the other (driver side) door is opening fully fine, let me see what’s different there. So I opened up its panel and found the plastic gear part etc in the same position. And now that door’s bar is also sticking out preventing it from opening fully 🙁 Do you know how I can fix this? Let me know if you need pics (and how I can send those), or you followed my explanation. Your help is truly appreciated.
And thanks for the wonderful work you are doing to help so many people everywhere!
Ben, I think I’ve been exactly where you were. Tell me this–was the window down on the sliding door that wouldn’t open all the way? If so, there is a mechanism that keeps the door from locking in the fully open position. I don’t understand why that is but if you roll up the window, the door will open fully and latch in the open position.
As for the digikey solution–I took apart the bad part after I replaced mine and it seems easy enough to replace the motor if it is an exact replacement. I just wouldn’t want to get my door open and then not have what I need to finish the job!! Check back in and let the community know how it goes.
Thank you so much for such helpful articles. My wife’s 2005 Sienna XLE just developed a problem with the passenger sliding door. When the door has fully opened, when we try to close electronically, it starts to move, but the bottom latch/lock does not release so the door just jerks a little and the electronics (motor) then just stops. How do I fix that? If I apply manual force to pull the door out at the bottom and then tug on the door handle, then the door starts moving forward, so seems like a manual issue. Your help is appreciated!
Ben, thanks for your question. When the door is fully open and if someone pushes the remote (or some other electronic way of closing the door) will it close if someone assists the door by pulling on the bottom of the door? OR, will it only close when you pull the handle when closing the door. That distinction (the latter) will tell you the motor is bad and you are on the correct article for replacing that. Let me know and I’ll get back to you.
John,
Thanks so much for this posting! Excellent write up and pictures. You saved me hours of frustration and hundreds of dollars! I just changed both sliding door lock mechanisms on my Sienna. First door took me a few hours because of the screws that held in the door lock motor were stubborn. Ended up using your dremel trick. My second door went smoothly, only took me an hour or so. Thx again.
Great to hear Matt–good job on the double repair! The second one is always easier but amazingly enough, the second door (driver’s side) is still working on our van and I haven’t had to replace it yet. I’ll tell you this much–I will use this guide when I do 🙂
Hello John,
My 2005 Sienna’s sliding doors quit working simultaneously. No remote, driver ceiling buttons, or outside latches will open/close the doors with or without the manual slide door button (driver controlled) showing orange (on / off). Any ideas on what to check? The rear hatch is fully functional. Hmmm…feels like a bad fuse somewhere or faulty manual slide button switch?
Let me make sure I understand your situation. Are you saying that your power doors are not working but you can manually open and close the door? OR, are you unable to open the door at all? Are you saying your door will not unlatch when you pull the inside and/or outside handles when it is in manual mode?
I executed both the LH sliding door cam+cable repair on my 2006 Sienna and the locking actuator. All parts were purchased via the link you recommended. Also purchased the extra door panel mounting studs (as you suggested might happen, two of my studs broke off when I pulled off the door trim).
The repair process you posted for both component replacements was spot on, with the most valuable elements being what not to do and what to look for in swapping out the new cable cam structure. Mine came from Toyota with 1/2 turn of the cabling having moved off the cam – easy enough to poke it back in, and then work the cables back and forth to assure proper seating. However, had you not mentioned it, I would have assumed the factory part (the white retaining clip was still firmly in place) would have prevented this slight unspooling.
Given the input proffered by others on the difficulty and solutions in removing the two retaining screws from the locking actuator, I deployed a wood burning iron to the heads of these screws. Of course the power of your iron will determine the needed duration of contact, but for me, two initial minutes slightly loosened the screws (one and a half turns). However, it was a slow process for as soon as the screw cooled it locked again. Took me three iron heating applications (thirty seconds per re-heating application) before I could use a pair of pliers to unscrew the remaining length of the screw. I also took your advice and purchased the Toyota screws with the actuator (by the time I was done both original screw heads were almost striped).
Wouldn’t have considered doing either of these two jobs without your well documented tutorial.
Thanks John! My door got stuck half open and wouldn’t budge, even when I switched to manual, the door wouldn’t move. My mechanic said the motor was dead and in order to use the door he would have to cut the cables. I’m attempting to do the repair this weekend with my husband, I’ll use my remote to see if the motor is actually working before I replace it. Thank you so much for your advice! (and for fixing my typo!)
I’m skeptical about your mechanic’s opinion that the motor that opens the door (the motor attached to the cables) is bad. Typically the cables either break outright or they fray and then the motor has difficulty pulling the frayed cables through the conduit. I had my door get stuck and it was only the cables. I have never heard a confirmed case of the motor going bad though. On the other hand, the motor the unlatches the door does go bad but that won’t cause the door to get stuck half way open. And by half way open you mean it slid half way (where you could squeeze out the door) but did not slide all the way to the place where it latches open, correct? This article is about replacing the assembly that unlatches the door and it does contain a motor that does go bad but you would be able to open your door by pulling the inside or outside handle and the door would operate correctly when manually unlatched.
Thank you John! Motor was indeed working fine, cables were a tangled mess though. The repair took hours but your instructions were excellent. Our door is sliding beautifully!
Hi John, I need to replace my motor as well as my cables (we cut them to make the door manual once the motor broke). I have read both of your tutorials but I’m not sure which one I do first, cables or motor? what do you suggest?
I don’t know that you would be able to tell that the door lock release motor was bad if your sliding door cables were broken Suzie. How are you sure that the door lock release motor is bad? When you open your doors by pushing a button inside the van or with the remote, the first thing that happens is that the door lock release motor releases the door latches for opening. Then the sliding door motor opens the door via the cables. If the cables are broken then nothing happens when you try remotely opening the door but that is the case whether or not the door lock release motor is bad or not. Once you get your inner door panel off you can use your remote and push the button and compare it to my videos embedded in this article to see that the door lock release motor is working or not. If you are certain they BOTH need replaced you ought to do them at the same time since you must do nearly all the work for replacing the door lock release motor when you replace the sliding door cable assembly. I hope this helps. I just didn’t want to counsel you to replace everything if the door lock release motor really didn’t need replaced. If you reply to this I’ll get back with you. (BTW: I corrected your typo in your comment so I just deleted your subsequent comment noting the typo)
Thank you for an awesome guide. I tinker with repairs all the time in a quest to save money, and this might have been the clearest guide I’ve ever used to do a repair. Those coming here wondering if they can do this: Have no fear! Here’s my two cents to add:
1. I used a heat gun on high setting to heat up the loctite screws in step 11. This melted the loctite in seconds and the screws came out very smoothly.
2. Just a small thing, but step 19a: reinstall the side trim board cover. Screw the window opener bit back in to the cover, then push the piece back in and screw back in the two side screws
Thanks to John for a fantastic guide, you’ve saved me hundreds!
Justin, thank you for taking the time to say thanks, for the feedback so I can continue to improve my tutorials, and for the compliments, I really appreciate it. I will add the tips you have shared.
Justin, and now I see what you were pointing out–my last step was missing. Thank you, I tried editing that page on my iPad and it deleted part of the article, including the end–thank you for pointing that out, I have re-added that final step.
Hey John, Great tutorial! Using the OEM Genuine Toyota Part made life a lot simpler. I recommend only extreme tinkerers with lots of time on their hands use the aftermarket parts. After the Cable Assembly replacement the door operates perfectly using the door handles.
I had hoped that the new Cable Assembly would fix all my door’s problems. Alas, I have had the same exact symptoms as you did with the Slide Door Lock Release Motor Assembly for several months before my cable broke. My door only rocks 1/8 inch and then returns to its original position when I try to open or close the door with the remote or the interior push buttons. My wife took the Sienna in to the Toyota dealer before the cable broke and they diagnosed the problem as a solenoid. Is there a solenoid included in the Slide Door Lock Motor Assembly, or was that just their stock answer?
There is no solenoid in the 2004-2010 Sienna sliding door. The door latch is actuated by an electric motor that has its own little gear box. This is the repair I wrote about here: How to Replace Sienna Slide Door Lock Release Motor Assy A solenoid is an electro-magnetic actuated rod that slides in and out based on whether the solenoid is energized. I took my door latch part apart to evaluate it when it broke so I know it is just a motor. If you can replace your sliding door cables you can EASILY do the door latch motor repair too! Good work and thanks for the comments and questions. Let me know if anything else comes up.
John – thanks for your guidance and patience. I have repaired my sliding power door that would open but only close manually. My voltage test showed power was being supplied to the lock release, but it would not allow the door to close. I used my soldering gun to heat the screws to about 325 F.I used my wife’s candy thermometer to measure the temp at the soldering gun tip. When I saw some smoke coming from the screw I guessed that the heat had melted the Loctite and tried to turn the screw. It turned so easily it seemed to be lubricated. The second screw also turned easily after heating. If you Google “Unlock Loctite” you will get several hits using a heat gun, soldering iron and cryogenic approaches.
Thank you for all of your blogs. I also followed your guidance and replaced my interior lights with LED’s and replaced the door switches on both sliding doors because I also had blinking dome lights.
You are so welcome Joe, thanks for sharing. I just replaced a tail light bulb which required another repair since the tail light broke when I removed it–please subscribe and you’ll be kept up-to-date with all the latest repairs of my Sienna, which, chances are, will become your problems too some day 🙂
John – I am waiting on the lock actuator assembly and have done some thinking about the difficulty you encountered removing the screws that hold the assembly. I have NOT tried this yet but am planning on trying it when I tackle the repair. I have a soldering iron (Weller Universal Multi-purpose Soldering Gun Kit – 140/100 watts that is more than the 80 watt recommended in the link below) that I plan to use. Since the assembly will be discarded after removal, I believe most of the risk will be avoiding burns in the tight working area. I will give you an update after I try it.
Using a soldering iron would be an option worth trying but I’m not certain the heat will flow to where you want it to since it is connected to such a large piece of metal but you surely could try it. The replacement part comes with new phillips-headed bolts if that is what you are concerned with. Please check back in and let us all know how it went.
Thanks for the quick reply and the info. I went back to your blog and found the part number that you documented. Sorry for the over sight. I will give you an update after I test and (hopefully) repair the problem. I also will share some other info about Toyota parts alternatives and a repair service I used (at a substantial savings) for my Map DVD drive.
John – Thank you for documenting the How To Replace The Slide Door Lock Release Motor Assy. I appreciate your thorough approach and your explanation of the reasons. Your pictures and videos are outstanding and they give me the confidence to do this. My question is: My 2008 Sienna right sliding door will open using any button, fob or handle with the window up or down. But it will only close using the inside/outside handle. I am waiting on the replacement clips before I pull the panel. I plan to check the voltage at the connector to see if the motor assembly has failed and will proceed with the replacement if it has. My uncertainty is because the door opens normally. One other question: Do I need the Toyota part number for the screws that were ground off or a simple description to get them from the hardware store.
Joe, thanks for your feedback and questions. When you use the physical handle on the inside or outside, the handle pulls a cable that physically unlatches the door so the door can open or close. When you use the button on the doorpost, the one on the ceiling between the driver/passenger seat, or the remote, the door latch release motor runs to pull the cable. When mine went bad the motor would try to pull the cable but just couldn’t do it. What I’m guessing is happening is that there’s more resistance to pulling the cable on the door close latch (because that latch is down at the bottom and toward the back of the door, where the other one is right there by the motor itself). When you remove the inner panel of your door you can test this theory by pushing your remote and seeing your motor try to unlatch it (but will fail). That’s what I was doing in the video I have embedded in this article. As for the screw-headed bolts that you’ll need to grind off–they come with the new part so you are all set if you order the part via my links above. Let me know if you have any other questions. Thanks!
Dear John:
Thanks a million…my repair went great.
Couple of suggestions…
I suggest purchasing a 10mm magnetic nut driver ($5.69 at McFadden Dale Hardware) and along with a Cordless Driver (mine was a Dewalt) to make removing the inner window bolts without a hitch. I also needed an extension as well to reach in there.
Along those same lines…using a cordless driver on removing the two screws holding the latch assembly will deliver sufficient torque to turn them out & brake the loctite hold. One came completely out and the other came 3/4’s out before the phillips head indentations stripped. Then I used a set of pliers to turn the remainder of the screw out.
Thanks again for your help…I could not have done it without you.
Having a magnetic socket would definitely be a handy tool to have when removing those window bolts! My electrical tape trick works fine though and is cheaper 🙂 As for the two screws that hold the window latch motor, it’s not always possible to unscrew them because the nut that is embedded in the plastic body of the part turns inside the plastic–you can turn it all you want and the nut just turns with the screw. I contacted a dealer after I did this repair to ask what they do and the guy replied that they just always grind the heads off the screws and don’t even mess with them. It’s great that you got yours out but I think that is a lucky case–typically they won’t come out.

(because some of them will often shatter when you pop off the door panel)
(it is a lot easier if you have a Stubby Phillips-Head Screwdriver
)
(for bolts on bottom of window glass)
(to cover up screwdriver to keep from scratching van when prying up inner door panels)
(if you really like tools and want to have “real” door panel removal tools–but you don’t need these, you can use a flat-head screwdriver too)
(IMPORTANT: I have been advised by real Toyota Repair Technicians that they just cut off the heads of the two phillips head bolts that hold this part on, in order to remove it. I can vouch that they would not unscrew for me either. So YOU WILL NEED A SMALL GRINDER to perform this repair.) I love my Dremel and if you don’t have one you ought to get one and you’ll find many other uses for it once you have it!
(make sure to get the “reinforced” ones because the other ones are brittle and break very easily)


I used a multi tool to cut through the plastic near the screws and got the old actuator assembly off. I then used the multitool to cut through the screws (the heads fell off into the door). I then replaced by running a zip tie to secure the new actuator. Piece of cake.
I just did this repair today, and I can’t say how thankful I am for this repair guide from John. Thanks for these precise and clear instructions. My repair went off without a hitch, and I was even able to get the two screws off from the back of the motor assembly with just a Philips screwdriver. I realize that this is probably an anomaly, but before I went to grind off the screws I decided to just try to unscrew them. I had the panel off far enough to fit in a screw driver with enough torque to unscrew them and, voila, off they came. Was definitely also grateful that I purchased the extra door clips since many of mine broke off when I took the panel off. I plan to do the driver side door next week!
I do have a question: the left/driver side sliding door on my 2005 XLE Sienna will not open/close with any buttons, and will also not open or close with the door handle. I can hear motors turning and trying to do something, but nothing happens. Unlike the other door that would at least open with the door handle, this one is basically a heavy manual door. I plan to replace the Slide Door Lock Release Control first, and then if that doesn’t fix it, move on to the motor. What are your thoughts?
Matt, I’ve never had to deal with a door that will not open so I don’t know what to tell you. I don’t have this version of the van anymore so I can’t even look at it to see what I might do. There is one screw on the back edge of the door that you’d need to remove to get the inner door panel off. I’m not sure if there is a right-angle phillips screw tool that could get that screw out.
John, I opened up the door and the cable was all mangled and broken. I will use your guide on replacing cables to fix this door and see if that does it. Thanks again! https://www.shareyourrepair.com/2014/01/how-to-replace-the-power-sliding-door-cables-2004-207-toyota-sienna-xle.html#parts
Thank you for the wonderful instructions, I ended repairing the problem for about $10 by buying only the small internal motor and a few machine screws/washers. I love the electrical tape trick!
A couple of things I did
1) Once the Phillips head screws stripped (which I expected) instead of dremeling off the head (didnt want to do this because I only planned to replace the internal motor) , I used the dremel to cut a deep slot in the stripped head, and a flat head screwdriver unscrewed them (i think the dremel cut had the side effect of heating the loctite and they came out super easy.)
2) i replaced the screws with some 4mm machine screws with hex heads and lock washers, much easier to remove in any future repair using a socket..
Thanks for sharing Dan, I’d read about that repair as well and I think it is a viable option–good work!
Hi the pictures do not display at all only the u tube links.?
I’ve looked at the page from two different devices and they all show up for me.
I don’t know the answer to your last question but you may find this link helpful:
https://www.siennachat.com/attachments/toy-slide-20door-20bulletin-pdf.785/
It appears you need part number 84260–08011.
I might suggest contacting Toyota of Montenegro to see if they can get the part: https://www.toyotacg.me/
I checked the resistance of the sensor and it does not show normal values. Indicates that the sensor is constantly under pressure (150 to 175 ohms). Can I buy a resistor that gives the same normal values and bridge it instead of the sensor, because there is no sensor in Montenegro for Sienna?
I cannot recommend bypassing a safety device which could close on a person’s body part or even a child’s neck and the door wouldn’t know to open back up.
First of all I have to thank you for your patience and advices you are giving me.
I have only one sensor, at the passenger side door, the driver side is manually. I will try to check resistance with no ohmmeter.
In any case I will let you know the result
When I try to open the door I get 12v and the door opens without error but when I try to close it they are “dead”, without voltage.
I checked the fuses but they are correct, as are all the relays on the COMPUTER MULTIPLEX NETWORK DOOR.
I do not know what other conditions must be met in order for the closure operation to start.
I just noticed that door touch sensor is pinched at few places. Can it be that that’s the problem? I know that that sensor is preventing door to close. I guess when pinched it sends the wrong signal to the computer (that the door is constantly obstructed) and therefore turns off the power needed to close.
If that door sensor was damaged it could definitely create the problem you are having. You can test the theory on the other door by squeezing the sensor and seeing if the behavior is the same.
Because I removed the panel from the door, I disconnected the connector, then checked the connectors with a voltmeter while pressing the button. I didn’t get 12v. But I find it weird that the opening works without a problem.
Ok, thank you. I wanted to make sure you didn’t assume it. Did you see 12v on that same pin when you attempted to open the door (with the connector disconnected)? You must use the body of the van as ground or your multimeter will not measure the voltage. The reason I ask is because some of these circuits must be connected in order for them to perform. Testing them would require the motor connected and then for you to either probe the pin on the (connected) connector or pierce the insulation on the wire (I recommend the former option). If you do see 12v when opening the but not closing, the multiplexor circuit which supplies the signal could be bad but I’ve never heard of that being the case. You need to systematically eliminate the possible causes.
Hello,
I am contacting you about a problem with the power sliding door on the 2006 Sienna.
When I press the button to open the door, it opens without any problems, but when I try to close it, the power door lock actuator (passenger side) does not get the required 12V.
Basically:
When door is CLOSED all buttons, key fob, handles work to OPEN the door automatically.
When door is OPEN all buttons, key fob, handles do not work – door only closes manually.
Can you give me some advice on what might be or what can I try?
How do you know the power door lock actuator doesn’t get 12v when you are attempting to close the door?
If you do drill the screws, they are M4-0.7 x 18mm, and you can get them at Home Depot for just over a buck.
Thanks for those details Nick!
John, thank you for the great instructions for changing the Sienna sliding door actuator motor. Everything went well, I ordered the replacment screws, and the motor via your links. I used a heat gun, 15 seconds on each and they unscrewed just fine. The only mistake I made was closing up the door panel without pulling the window switch out first, I unpoped the door and did it again. Anyway, all in all 2 hours time well spent. Thanks again for your instructions.
-Brian
Thanks for sharing Brian—good work on fixing your door!
Search for my comment in the cable replacement repair dated “James Booth
03/28/2017 at 2:16 pm”. After using a multi tool to cut the tab at the bottom of the door, and around the handle trim, you can take the panel off and reach inside the door to open it.
I’d like to help Don with removing the panel so he can get access to the insides. I fixed mine 3 yrs ago so my memory is foggy. But you can use a multi-tool to cut the tab that holds the bottom edge of the panel to the door. I think that frees it up enough so you can then pull the panel away to get inside. I posted on this back in Dec 2018 but I don’t see it in the comments. I know I was able to reach into the door toward the back edge with the window partially lowered. I could grab a cable or latch back there that let the rear of the door come open, and then something else to release the front latch.
Impressive information John, I have a circular problem. On a 2010 Sienna I can’t get the driver side sliding door open to access the trim panel attachments to access the internal parts to get the door open.
The cable broke a while back and I cut the whip end off. We used it manually for a while. Then it became non-responsive. Inner and outer handle do nothing, electronic controls do nothing, no motor or solenoid sounds. I tried holding the outer handle “open” and body bumping from inside – nothing. Inner handle and lock feel disconnected (no resistance to movement) and I am out of ideas on how to gain access. I have an aftermarket cable assy on hand and figure i will need more parts once I can get it open. Most I have been able to get off is the window trim.
Any ideas on how to get the door open so I can start the work?
I don’t have a solution for you although I’m sure there is a way. The handles pull a cable that unlatched the front and rear latches of the door. The electrical switch and the hand latches all come together into one place inside the door so it something is broken downstream from there you will bend to find a different way of getting inside the door panel to actuate it. Make sure to try bumping the door open with tour body after using the door switch buttons if the handles don’t work. That’s all I can offer, sorry.
Hello. My 2013 Toyota Sienna passenger side sliding door will only close with the remote every other time. I have had it looked at several times at the Toyota dealer but they can’t find out the problem and can’t fix it.
Humm, if the dealer can’t fix it I don’t know what to say. Check the cables for fraying, verify there’s nothing in the track the the door rolls in.
I was so excited to see such a great step by step troubleshooting guide 🙂 Obviously taking this to Toyota is just way too expensive so I was hoping that you might have some ideas on what to look at.
I am not sure where to ask you this question as I don’t know if it’s a wiring harness or the actuator I may send it to both.
It’s a 2006 Sienna with passenger power sliding door issues. 2 issues: when you activate any of the switches to shut the door it does move and try to close 1) it is very slow and gets slower 2) as the door shuts and engages the locking mechanism it only locks part way. I believe it is a two stage door closing process. The first engages the front lock and the second pushes the rear of the door into the body. So there is only one click heard instead of the standard two. Front engages and rear doesn’t close all the way.
I’ve heard wiring harness and have heard about the motor. I really would like to help my parents fix their van. Any thoughts?
Thanks
I have not had that problem on my van and have not worked on the powered close mechanism so I’m sorry that I can’t give you any advice, yet… who knows, I may be due to have the same problem eventually.
I’m planing to a new part with 2 screws. How about I drill the 2 screws from my side even if could damage the old part? I’m going to through the old part anyway.
Well, the work described in this article seems much more sophisticated than this one. I’ll study this further to decide if I want to try or not. Thanks.
Hey, thanks for the fast response.
Actually, inside handle and the black button works just fine.
Taking off tha panel seems to be a good idea. I guess I’ll definitely be able to “see” the problem I have.
Thanks again.
The fact that only the outside handle does not work makes it pretty certain that something is going on with the cable that connects the door handle to the latching hub. This tutorial and my How to Replace Power Sliding Door Cables on 2004-2010 Toyota Sienna article should show you almost everything you need to do. You may need to remove the window to get to the bolts that attach the door handle to the door. Let us know what you do and how it turns out.
Hi Jone,
What a great guide you have here.
I’ve reviewed and prepared for the repaire myself, but just before I try to be sure if I am having the exact problem, I am quite confused.
I have a 2010 Sienna, and its Sienna sliding doors seem to open very well with the indoor door open button. I am having problems with opening the door when I try to open with the outside handle. I feel that my car’s symptoms are quite opposite of what’s described.
Do you think I should still go on for the fix or search for some other causes?
Thanks.
JP.
I have some questions. When you say, “seem to open very well with the indoor door open button” do you mean the handle or the black push-button on the front door post? If you mean the black button on the door post, then this article will not solve your problem. If the outside handle will not open the door then you may have a broken handle. That handle, when you pull it out, pulls a cable. Where that cable attaches to the handle may have broken. You can always follow the steps in this article to remove the inner door panel and then run the door through its paces and you will be able to see what is going on. That is what I would probably do if I were in your situation. It’s only about 10 minutes work to get that inner door panel off. Don’t forget that screw on the bottom back edge of the door.
Good info! I did this with the digikey motor instead of replacing the actuator. It went well. I ordered these 2 screwdrivers from amazon https://amzn.to/2wQIIfR and https://amzn.to/2oLo7Fk. The digikey motor was $10 shipped. So for $30 it is finished and I have 2 new screwdrivers. I did NOT have to do anything to get the 2 screws out, just apply firm hard proper pressure to the screws with those new screwdrivers, but it was on the edge, I would order the 2 screws if I ever had to do it again just in case. To re-insert the screws I cleaned them off with a wire wheel and used a tap to clean out the threads. It all works perfect now.
Thanks! I was finally able to remove the screws successfully by heating them up quite a bit (several times – like it isn’t hot enough already outside in my garage) and using pliers to rotate them out. Not easy!!!
Now, I don’t see specific instructions on how to release the motor assembly cable from the door (so I can work on it in A/C). I would like to separate it but I’m sure there is some sort of release mechanism for it. Please help.
Sorry – I’m not sure I understand. I only bought the replacement motor, not the whole assembly. If I drill off the screw heads, will the whole assembly still come off and then I can open it up and replace the motor at that point? Will this work?
Ok, I understand your predicament now. If you want to get the screws out of the assembly so you can swap out the motor, then you will need to heat up that screw to release the thread lock. I haven’t done this so you’ll have to feel your way through it. I can tell you that the screw threads into a threaded cylindrical metal piece imbedded into the injection-molded case and that cylinder will turn inside the plastic if you get it all too hot. I had the cylinder turn just by cutting a new slot in the head of the screw and applying a bunch of force. Hopefully the thread lock melts before the plastic.
In the middle of this repair and struggling to get the 2 screws out with the loctite on them.
Tried:
1) Used a special MAZO drill bit to try to drill the screws out – tore them up a bit
2) Borrowed a friend’s Dremel 4000 and bought the reinforced discs and cut out the back end of the screws (hit a few things in the process that hopefully won’t impact door operation). Also tried to Dremel the heads of the screws to flathead style to help get the screws out. Still could not get them out.
Next steps:
3) Should I go buy a heat gun and try hitting the screws with high heat to see if melting the loctite will help and pull them out after? What’s the best tool to use at this point with these beat up screw heads?
4) Other ideas?
-Pete
Peter, thanks for the question. If you purchased the replacement part, I recommend using your Dremel to completely grind off the heads of the screws. By heads I mean the parts that are circled in red in Step 11. If you remove the screw heads then the part will be completely freed, given you disconnected the wire linkage in Step 10. Let me know if you have any other questions.
Thanks for posting this! I did the repair on my Sienna today but opted to replace just the motor (which I ordered from Digikey) in lieu of the entire assembly. I’m calling my repair 95% successful…
After I had everything put back together I started having problems with the automatic door button that’s next to the sliding door. I can’t open the sliding door with the button, but I can close the door. If the door is closed and I press the button I get absolutely no response. I find it odd that the button works fine when closing the door but is dead when trying to open it. The key fob and driver buttons work fine though…
Any ideas?
If I were you I would take the inner panel of the door off and then run the door through the paces and watch what happens when the door won’t open when you push the button. I think you will be able to see what is going wrong. Check back in and let us know if you are able to fix it.
John I did not get voltage on the lock release motor connector of my 2008 Toyota Sienna. Do you have an electric wiring diagram of the sliding door that would help trace the problem?
I didn’t think to take any pictures when I installed the Digikey motor in my Sienna two years ago but I found a YouTube video of a guy who shows how to do it. It’s the same process I used.
https://m.youtube.com/watch?v=TJfNeTOy-ik
The part number for the motor is PAN14EE12AA1.
John,
I just read your instructions for this repair. I wish I had seen them two years ago. I fumbled my way through the repair and eventually replaced the old motor with the $5 replacement from DigiKey.
One thing I did differently. The screws that you mentioned stripping are not standard Phillips. That’s why they strip so easily. You need to use a JIS screwdriver (Japanese Industry Standards). They are not the same as Phillips. I used a heat gun to soften the loctite and a JIS screwdriver and I did not strip the screws on either side.
If people want to attempt to get the screws out without stripping them then hopefully this helps.
To be safe though, I would still recommend people follow your advice and order the replacement screws.
Thanks for the information Jed–I will add this to the aticle. Can you please post the DigiKey part number so I can share it in the article? Thanks!
Hi John,
I inadvertently posted my comment above in the wrong repair. The comment above was actually meant for your other sliding door repair. I will go over to that repair and add a comment with the picture that shows the clip. Sorry for my error.
You can delete this comment from this repair if necessary.
Fantastic write-up! I used your directions to fix the driver’s side and will soon be tackling the passenger side.
I have one thing to add. While removing the old sliding door assembly from the door I broke one of the little black clips that holds the two plastic rods on the sliding door assembly.
The part number for the clip is 90467-13046. It’s about $2.
Also, another person mentioned they stripped the middle bolt that holds the window bracket in place. I did the same so be careful when reinstalling this bolt. A quick trip to Ace hardware and I was able to piece together a solution.
Thanks again for the excellent write-up!
Thanks Jed and good job on repairing your van!
Jed, the clip you are referring to, is it the one pictured in step 9?
John – I have a sliding door that won’t completely close. The cables broke some time ago and it’s been used manually since that time but recently the door quit closing all the way at the rear end of the door. I believe when you get to the final 1/2″ of the door latching a motor kicks in and draws it in the rest of the way. I would be glad to get this door to shut and never open again if I could figure out how to get this to close completely. Any suggestions would be appreciated. Thanks!
There is a motorized lock assembly that pulls the rear edge of the door shut. I have no experience of working on this motor but it can be seen in this diagram:
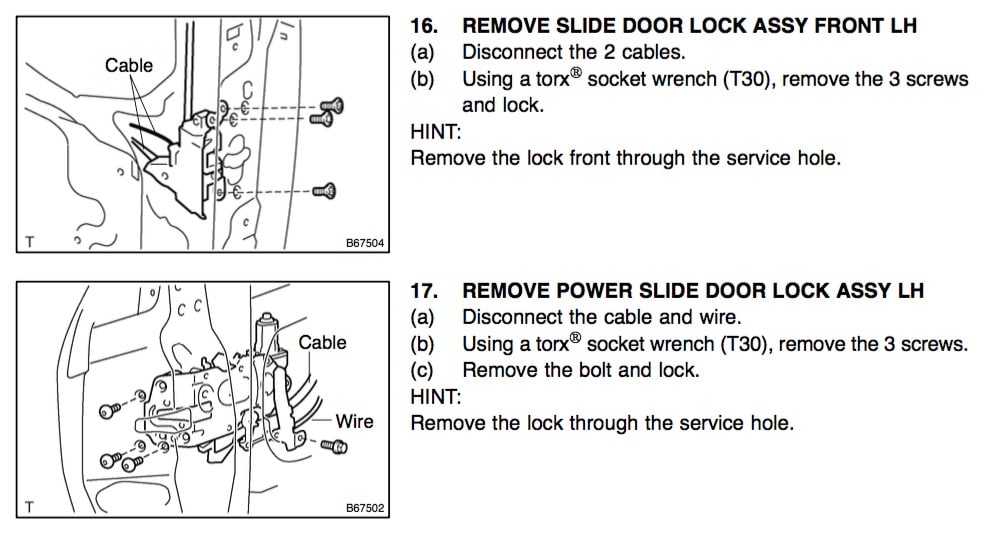
I have a Sienna 2004 XLE I am looking to replace the OEM TOYOTA SIENNA SLIDING DOOR LOCK PASSENGER SIDE 69050-08040 FITS 2004-2010 but can not find any tutorials. Can you help? Will I have to take the entire door off to access the cables? Thanks.
Part Number 69050-08040
I’ve not replaced that part but it doesn’t appear that you need to remove the door from this image:
Thanks for the quick response. I’m sorry that I wrongly described the first point. I meant: 1. The door’s POWER does not respond to the door handles for opening or closing unless I move the door a little, then the power starts and takes over. I did verify that the fuses, #14 under the hood and #39 under the dash, are good.
Sorry for the duplicates replies, could you please remove them. Thanks
Thanks for the quick response. I’m sorry that I wrongly described the first point. I meant: 1. The door’s POWER does not respond to the door handles for opening or closing unless I move the door a little, then the power starts and takes over. I did verify that the fuses, #14 under the hood and #39 under the dash, are good.
Thanks John for this awesome tutorial. I have a 2008 LE Sienna, and the passenger power sliding door has a problem which is a little bit different. The symptoms are:
1. The door DOES NOT RESPOND to the door handles for opening or closing UNLESS I move the door a little, then the power starts and takes over.
2. The door responded to the key fob and the electric buttons, HOWEVER, wouldn’t open or close UNLESS I UNLATCH IT MANUALLY by grabbing one of the door’s handles.
3. I removed the door panel and I the latch actuator does not receive power when I push any of the electric buttons.
I’m wondering if the problem from the door ECU or the door needs to be reset or there is something else!
Any idea or suggestions?
Thank you
Thanks for the question. The symptoms are strange in that in your point #1, the door doesn’t respond to the handle, but in point #2 it doesn’t respond unless you pull the door handle. We need to start eliminating possible causes. The fuses that cover the sliding doors are #14 and #39 as detailed in my article: Toyota Sienna Fuse Locations. Verify that they are good. Check back in and let us all know what you find.
John – I am preparing to sell my 2008 Sienna and guess what popped up? My right sliding door would open but not close using the remote or buttons. I pulled the the door panel and disconnected the lock release electrical connector and checked for power and it was fine. I suspected the lock release assembly was okay, but wondered if it was not getting power because the power connector had come loose. Three small cable ties around the two connector parts and the right sliding door worked fine! My Sienna has a slot/tab type of connection which made me guess that parts might separate. Upon close examination I noticed the slot had been torn and the tab could pull through. This may be the only case of this happening, but it happened twice after the initial replace of the assembly. It seems like there is some type of pulling on the power connector that allowed them to separate and I wasn’t able to determine what caused them to pull apart. Thanks again for your help on this and other Sienna repairs.
Good job on troubleshooting your Sienna. I haven’t experienced that problem and haven’t had anyone else mention it either, until now. Good work Joe!
This guide was the best written car repair that I’ve ever seen. Showing me how to take everything apart step by step, how to troubleshoot the motor to make sure I was fixing the right thing, plus all of the tips and tricks for how to avoid dropping the bolts into the window were fantastic. Not to mention embedded links in the guide to take me directly to the right parts to order from Toyota. Thank you for putting this much time and effort into sharing your knowledge. You saved me hours of frustration and hundreds of dollars.
One pro tip: remember to unlock the door when you want to test it! The door must be locked to get the side trim board cover off. I had a few minutes of terror when I couldn’t get the door to work after my repair, because I forgot that the door was still locked 🙂
Well thanks for the feedback Frank, I appreciate it. Good work on repairing your van–I bet it felt real good when that sliding door finally opened on its own again!
John!
That was exactly it! It was the windows! The first door, at first, I tried taking off the panel without removing the window trim piece (some other youtube videos showed that) but that didn’t work. So I followed your instruction – and had to lower the window, and sometime after that noticed the bar preventing the door opening fully! And then on the second door, I lowered the window and same thing. Looking at the shape of the piece and analyzing the mechanics, I knew there had to be something that would rotate the plastic piece, and I tried troubleshooting it… but just hadn’t thought of the window! So thanks again… BTW, you are truly dedicated… I cannot believe how prompt you have been with the replies! Thanks!
And here’s maybe my bit to return your favor a little… I think the door is prevented from opening fully when the window is down, as a safety mechanism… in case a kid is sticking out their head, to avoid injury/death. There is enough opening left even with the door fully open that a hand sticking out would not be crushed, but a head certainly could, so Toyota designed it to prevent opening fully and leave enough gap.
Reg the actuator motor – I ordered just the Digikey motor last night (this morning) at 2am (around the time I posted my last comment)… couldn’t go to sleep without a plan forward 🙂 I’m keeping my fingers crossed that this is it and fixes the issue. Don’t wanna spend too much on this car at this time if we can avoid it… ironically, 3 months ago, we were thinking of replacing our Sienna with a smaller car, but couldn’t really go ahead with it (partly because I’m tall, and my son is almost getting there, so a “small” car wouldn’t really work, and we already have a CRV)… so we invested in some significant things in the Sienna: front wheel bearings, hubs, then the radiator started leaking, we’re replacing the front brake rotors and pads, and getting new tires… and we thought that would hold us for a while, and last night the door broke!
John,
Just wanted to share an update – so the DigiKey motor arrived on Wed and I took the rest of the door apart to put it in. MAN – the 2 screws to remove the actuator part were SO PAINFUL – it took an extra 2 hours just to manage the screws! Long story, but I ended up removing the metal cylinder inside the plastic housing on both sides, and just put in new screws (maybe long electrical switch screws) with nuts to hold it. Really not sure why Toyota designed the part to be screwed from the inside, and why they used such terrible screws.
Anyway, the repair was completed successfully and the door now works! Thanks for your help!
Great to hear you have your van fixed–good work.
John, thanks so much for getting back so quickly. So I did more comprehensive troubleshooting, and it does look like the actuator motor is bad – all electronic ways to open/close the door fail, but mechanical ways (pulling the outside or inside handle *fully* work (a soft pull does not work because its the same as electronic). So I’m thinking of replacing just the motor inside the assembly (found references to the $5 DigiKey motor replacement) – any advice/thoughts on that?
Also, I noticed another problem develop, and am not sure if it is related to the motor going bad. The door does not fully open – it stops a little short at the end (stays there). Looks like there is a metal bar at the bottom of the door that is now protruding that is in the way and it blocks the door from opening fully. If I hold this metal bar back while the door is opening, the door opens fully and the “U” shaped metal assembly next to this bar correctly engages and holds the door open. This bar is connected via a spring loaded wire that is connected to a plastic part mounted on a metal rotor roughly in the center of the door. It looks like this may rotate, and then the wire would pull less and that engages the metal bar and keeps it out of the way allowing the door to open fully. I didn’t do anything to that part to cause this. So I thought, the other (driver side) door is opening fully fine, let me see what’s different there. So I opened up its panel and found the plastic gear part etc in the same position. And now that door’s bar is also sticking out preventing it from opening fully 🙁 Do you know how I can fix this? Let me know if you need pics (and how I can send those), or you followed my explanation. Your help is truly appreciated.
And thanks for the wonderful work you are doing to help so many people everywhere!
Ben, I think I’ve been exactly where you were. Tell me this–was the window down on the sliding door that wouldn’t open all the way? If so, there is a mechanism that keeps the door from locking in the fully open position. I don’t understand why that is but if you roll up the window, the door will open fully and latch in the open position.
As for the digikey solution–I took apart the bad part after I replaced mine and it seems easy enough to replace the motor if it is an exact replacement. I just wouldn’t want to get my door open and then not have what I need to finish the job!! Check back in and let the community know how it goes.
Thank you so much for such helpful articles. My wife’s 2005 Sienna XLE just developed a problem with the passenger sliding door. When the door has fully opened, when we try to close electronically, it starts to move, but the bottom latch/lock does not release so the door just jerks a little and the electronics (motor) then just stops. How do I fix that? If I apply manual force to pull the door out at the bottom and then tug on the door handle, then the door starts moving forward, so seems like a manual issue. Your help is appreciated!
Ben, thanks for your question. When the door is fully open and if someone pushes the remote (or some other electronic way of closing the door) will it close if someone assists the door by pulling on the bottom of the door? OR, will it only close when you pull the handle when closing the door. That distinction (the latter) will tell you the motor is bad and you are on the correct article for replacing that. Let me know and I’ll get back to you.
John,
Thanks so much for this posting! Excellent write up and pictures. You saved me hours of frustration and hundreds of dollars! I just changed both sliding door lock mechanisms on my Sienna. First door took me a few hours because of the screws that held in the door lock motor were stubborn. Ended up using your dremel trick. My second door went smoothly, only took me an hour or so. Thx again.
Great to hear Matt–good job on the double repair! The second one is always easier but amazingly enough, the second door (driver’s side) is still working on our van and I haven’t had to replace it yet. I’ll tell you this much–I will use this guide when I do 🙂
Hello John,
My 2005 Sienna’s sliding doors quit working simultaneously. No remote, driver ceiling buttons, or outside latches will open/close the doors with or without the manual slide door button (driver controlled) showing orange (on / off). Any ideas on what to check? The rear hatch is fully functional. Hmmm…feels like a bad fuse somewhere or faulty manual slide button switch?
Let me make sure I understand your situation. Are you saying that your power doors are not working but you can manually open and close the door? OR, are you unable to open the door at all? Are you saying your door will not unlatch when you pull the inside and/or outside handles when it is in manual mode?
John,
I executed both the LH sliding door cam+cable repair on my 2006 Sienna and the locking actuator. All parts were purchased via the link you recommended. Also purchased the extra door panel mounting studs (as you suggested might happen, two of my studs broke off when I pulled off the door trim).
The repair process you posted for both component replacements was spot on, with the most valuable elements being what not to do and what to look for in swapping out the new cable cam structure. Mine came from Toyota with 1/2 turn of the cabling having moved off the cam – easy enough to poke it back in, and then work the cables back and forth to assure proper seating. However, had you not mentioned it, I would have assumed the factory part (the white retaining clip was still firmly in place) would have prevented this slight unspooling.
Given the input proffered by others on the difficulty and solutions in removing the two retaining screws from the locking actuator, I deployed a wood burning iron to the heads of these screws. Of course the power of your iron will determine the needed duration of contact, but for me, two initial minutes slightly loosened the screws (one and a half turns). However, it was a slow process for as soon as the screw cooled it locked again. Took me three iron heating applications (thirty seconds per re-heating application) before I could use a pair of pliers to unscrew the remaining length of the screw. I also took your advice and purchased the Toyota screws with the actuator (by the time I was done both original screw heads were almost striped).
Wouldn’t have considered doing either of these two jobs without your well documented tutorial.
Thank you for your fine work.
Larry
Thank you so much for the comments and feedback Larry, you are so welcome. Good work on the repairs!
Thanks John! My door got stuck half open and wouldn’t budge, even when I switched to manual, the door wouldn’t move. My mechanic said the motor was dead and in order to use the door he would have to cut the cables. I’m attempting to do the repair this weekend with my husband, I’ll use my remote to see if the motor is actually working before I replace it. Thank you so much for your advice! (and for fixing my typo!)
I’m skeptical about your mechanic’s opinion that the motor that opens the door (the motor attached to the cables) is bad. Typically the cables either break outright or they fray and then the motor has difficulty pulling the frayed cables through the conduit. I had my door get stuck and it was only the cables. I have never heard a confirmed case of the motor going bad though. On the other hand, the motor the unlatches the door does go bad but that won’t cause the door to get stuck half way open. And by half way open you mean it slid half way (where you could squeeze out the door) but did not slide all the way to the place where it latches open, correct? This article is about replacing the assembly that unlatches the door and it does contain a motor that does go bad but you would be able to open your door by pulling the inside or outside handle and the door would operate correctly when manually unlatched.
Thank you John! Motor was indeed working fine, cables were a tangled mess though. The repair took hours but your instructions were excellent. Our door is sliding beautifully!
Suzie, that is great to hear. I’m glad your sliding doors are working again. Good job on the repair.
Hi John, I need to replace my motor as well as my cables (we cut them to make the door manual once the motor broke). I have read both of your tutorials but I’m not sure which one I do first, cables or motor? what do you suggest?
I don’t know that you would be able to tell that the door lock release motor was bad if your sliding door cables were broken Suzie. How are you sure that the door lock release motor is bad? When you open your doors by pushing a button inside the van or with the remote, the first thing that happens is that the door lock release motor releases the door latches for opening. Then the sliding door motor opens the door via the cables. If the cables are broken then nothing happens when you try remotely opening the door but that is the case whether or not the door lock release motor is bad or not. Once you get your inner door panel off you can use your remote and push the button and compare it to my videos embedded in this article to see that the door lock release motor is working or not. If you are certain they BOTH need replaced you ought to do them at the same time since you must do nearly all the work for replacing the door lock release motor when you replace the sliding door cable assembly. I hope this helps. I just didn’t want to counsel you to replace everything if the door lock release motor really didn’t need replaced. If you reply to this I’ll get back with you. (BTW: I corrected your typo in your comment so I just deleted your subsequent comment noting the typo)
Found it on the Tundra solutions dot com site.
I thought I saw people found a $4 motor from digi-key that works, but I can’t find it in this or your door cable repair instructions.
Thank you for an awesome guide. I tinker with repairs all the time in a quest to save money, and this might have been the clearest guide I’ve ever used to do a repair. Those coming here wondering if they can do this: Have no fear! Here’s my two cents to add:
1. I used a heat gun on high setting to heat up the loctite screws in step 11. This melted the loctite in seconds and the screws came out very smoothly.
2. Just a small thing, but step 19a: reinstall the side trim board cover. Screw the window opener bit back in to the cover, then push the piece back in and screw back in the two side screws
Thanks to John for a fantastic guide, you’ve saved me hundreds!
Justin, thank you for taking the time to say thanks, for the feedback so I can continue to improve my tutorials, and for the compliments, I really appreciate it. I will add the tips you have shared.
Justin, and now I see what you were pointing out–my last step was missing. Thank you, I tried editing that page on my iPad and it deleted part of the article, including the end–thank you for pointing that out, I have re-added that final step.
Hey John, Great tutorial! Using the OEM Genuine Toyota Part made life a lot simpler. I recommend only extreme tinkerers with lots of time on their hands use the aftermarket parts. After the Cable Assembly replacement the door operates perfectly using the door handles.
I had hoped that the new Cable Assembly would fix all my door’s problems. Alas, I have had the same exact symptoms as you did with the Slide Door Lock Release Motor Assembly for several months before my cable broke. My door only rocks 1/8 inch and then returns to its original position when I try to open or close the door with the remote or the interior push buttons. My wife took the Sienna in to the Toyota dealer before the cable broke and they diagnosed the problem as a solenoid. Is there a solenoid included in the Slide Door Lock Motor Assembly, or was that just their stock answer?
There is no solenoid in the 2004-2010 Sienna sliding door. The door latch is actuated by an electric motor that has its own little gear box. This is the repair I wrote about here: How to Replace Sienna Slide Door Lock Release Motor Assy A solenoid is an electro-magnetic actuated rod that slides in and out based on whether the solenoid is energized. I took my door latch part apart to evaluate it when it broke so I know it is just a motor. If you can replace your sliding door cables you can EASILY do the door latch motor repair too! Good work and thanks for the comments and questions. Let me know if anything else comes up.
John – thanks for your guidance and patience. I have repaired my sliding power door that would open but only close manually. My voltage test showed power was being supplied to the lock release, but it would not allow the door to close. I used my soldering gun to heat the screws to about 325 F.I used my wife’s candy thermometer to measure the temp at the soldering gun tip. When I saw some smoke coming from the screw I guessed that the heat had melted the Loctite and tried to turn the screw. It turned so easily it seemed to be lubricated. The second screw also turned easily after heating. If you Google “Unlock Loctite” you will get several hits using a heat gun, soldering iron and cryogenic approaches.
Thank you for all of your blogs. I also followed your guidance and replaced my interior lights with LED’s and replaced the door switches on both sliding doors because I also had blinking dome lights.
You are so welcome Joe, thanks for sharing. I just replaced a tail light bulb which required another repair since the tail light broke when I removed it–please subscribe and you’ll be kept up-to-date with all the latest repairs of my Sienna, which, chances are, will become your problems too some day 🙂
John – I am waiting on the lock actuator assembly and have done some thinking about the difficulty you encountered removing the screws that hold the assembly. I have NOT tried this yet but am planning on trying it when I tackle the repair. I have a soldering iron (Weller Universal Multi-purpose Soldering Gun Kit – 140/100 watts that is more than the 80 watt recommended in the link below) that I plan to use. Since the assembly will be discarded after removal, I believe most of the risk will be avoiding burns in the tight working area. I will give you an update after I try it.
Using a soldering iron would be an option worth trying but I’m not certain the heat will flow to where you want it to since it is connected to such a large piece of metal but you surely could try it. The replacement part comes with new phillips-headed bolts if that is what you are concerned with. Please check back in and let us all know how it went.
Thanks for the quick reply and the info. I went back to your blog and found the part number that you documented. Sorry for the over sight. I will give you an update after I test and (hopefully) repair the problem. I also will share some other info about Toyota parts alternatives and a repair service I used (at a substantial savings) for my Map DVD drive.
Ok, great, and yes, please check back in to report how your repair went and what you learned–I’m very interested to hear how it turns out.
John – Thank you for documenting the How To Replace The Slide Door Lock Release Motor Assy. I appreciate your thorough approach and your explanation of the reasons. Your pictures and videos are outstanding and they give me the confidence to do this. My question is: My 2008 Sienna right sliding door will open using any button, fob or handle with the window up or down. But it will only close using the inside/outside handle. I am waiting on the replacement clips before I pull the panel. I plan to check the voltage at the connector to see if the motor assembly has failed and will proceed with the replacement if it has. My uncertainty is because the door opens normally. One other question: Do I need the Toyota part number for the screws that were ground off or a simple description to get them from the hardware store.
Joe, thanks for your feedback and questions. When you use the physical handle on the inside or outside, the handle pulls a cable that physically unlatches the door so the door can open or close. When you use the button on the doorpost, the one on the ceiling between the driver/passenger seat, or the remote, the door latch release motor runs to pull the cable. When mine went bad the motor would try to pull the cable but just couldn’t do it. What I’m guessing is happening is that there’s more resistance to pulling the cable on the door close latch (because that latch is down at the bottom and toward the back of the door, where the other one is right there by the motor itself). When you remove the inner panel of your door you can test this theory by pushing your remote and seeing your motor try to unlatch it (but will fail). That’s what I was doing in the video I have embedded in this article. As for the screw-headed bolts that you’ll need to grind off–they come with the new part so you are all set if you order the part via my links above. Let me know if you have any other questions. Thanks!
Dear John:
Thanks a million…my repair went great.
Couple of suggestions…
I suggest purchasing a 10mm magnetic nut driver ($5.69 at McFadden Dale Hardware) and along with a Cordless Driver (mine was a Dewalt) to make removing the inner window bolts without a hitch. I also needed an extension as well to reach in there.
Along those same lines…using a cordless driver on removing the two screws holding the latch assembly will deliver sufficient torque to turn them out & brake the loctite hold. One came completely out and the other came 3/4’s out before the phillips head indentations stripped. Then I used a set of pliers to turn the remainder of the screw out.
Thanks again for your help…I could not have done it without you.
Having a magnetic socket would definitely be a handy tool to have when removing those window bolts! My electrical tape trick works fine though and is cheaper 🙂 As for the two screws that hold the window latch motor, it’s not always possible to unscrew them because the nut that is embedded in the plastic body of the part turns inside the plastic–you can turn it all you want and the nut just turns with the screw. I contacted a dealer after I did this repair to ask what they do and the guy replied that they just always grind the heads off the screws and don’t even mess with them. It’s great that you got yours out but I think that is a lucky case–typically they won’t come out.